Showing posts with label before and after. Show all posts

Tuesday, February 19, 2019

Where does the time go?

Soooooooooooo, a short 6 months later and here I am again. What?! How does that even happen. Time passes so quickly. Sheesh!!!

Instead of a New Year's resolution, I went with a focus word for this year once again. For 2019 I've decided that my focus is going to be 'DONE'. I have so many things in progress (crafting and everyday life) that I just want to get some of them done. Wish me luck!!

What even got me moving in that direction (craft wise) is a piece I had stitched years ago. It was a Christmas piece and over time had gotten loose in the hoop I had used to finish it. For years I had been telling myself that I needed to fix it. For years! I finally decided that enough was enough and I needed to just get that done.


So I did.

Here's the piece from before....


It was getting all loose and stretched out in the frame. Not to mention that over the years it had also gotten dirty.

I had glued that baby in place and, to be honest, I did one heck of a job doing it. I had a devil of a time getting that piece out. I didn't want to just cut it because I didn't have all that much room around it. In the end, I had to break that hoop into pieces to get the stitching out of there.

After all of that, it deserved a little time at the spa.


After a good soaking, drying, and pressing, I put it back together in a new finish.


I bought a package of cloth napkins and used them to make a pillow cover. I stitched the cross stitch piece near the edge and then covered my stitch line with some gold trim that I hand stitched on so that I could hide the stitching.

The napkins are sewn together on three sides. The white you can see is some ribbon used to tie the bottom closed after I put the pillow form inside. This is a great way to be able to store the pillow cover instead of having to store a hole bunch of fat pillows.

So, that's one thing done. Now on to many others...........or at least that's the plan.

Tuesday, January 10, 2017

Better this year

Happy New Year!!!

I'm so sorry that I was mostly absent last year. I did stuff.....I just didn't put it here.

Soooooo, this year, once again, I have chosen a focus word for the year rather than setting resolutions that will be broken and forgotten by the end of January. My focus word for 2017 is 'Better'. Keeping up with this blog and my other one are both part of my goal of being better. And there are only a million other things that I need to be better at also, but anything I do better is an improvement.

Awhile back, I had seen a picture in a catalog of a sweatshirt with a lace heart on it. The price on it was outrageous, and especially so since I knew I could make one. There wasn't anything special to it.

I took a sweatshirt from my son (he never wore it) and got a lace curtain panel off of ebay for a couple of bucks.


 I cut the shape out of my lace. Used iron on bonding to attach it to the shirt, and wallah.......


If you decide to make one, a word of caution though.  Because lace is, well......lace, make sure that you have some wax paper, or freezer paper, covering what would be the exposed part of the lace so that the bonding stuff doesn't melt to your iron.

If you try it, let me see some pictures. I'd love to see yours and see what other shapes people might choose to go with.

Thanks for stopping by. I'm going to try to be BETTER about posting this year. And I hope that everyone has a year that is better than last year..........even if you had a great year last year, I hope that this one is even better.

See ya soon!

Friday, February 20, 2015

New soap dispenser


I do love a quick and easy project!

BEFORE:


AFTER:


All done.

Thursday, February 20, 2014

Shirt Upcycle

I saw a really cute shirt on Craft Gossip or so I thought. I went back to look for it so that I could include a link in this post but couldn't find it.

Anyway, here's what I did.

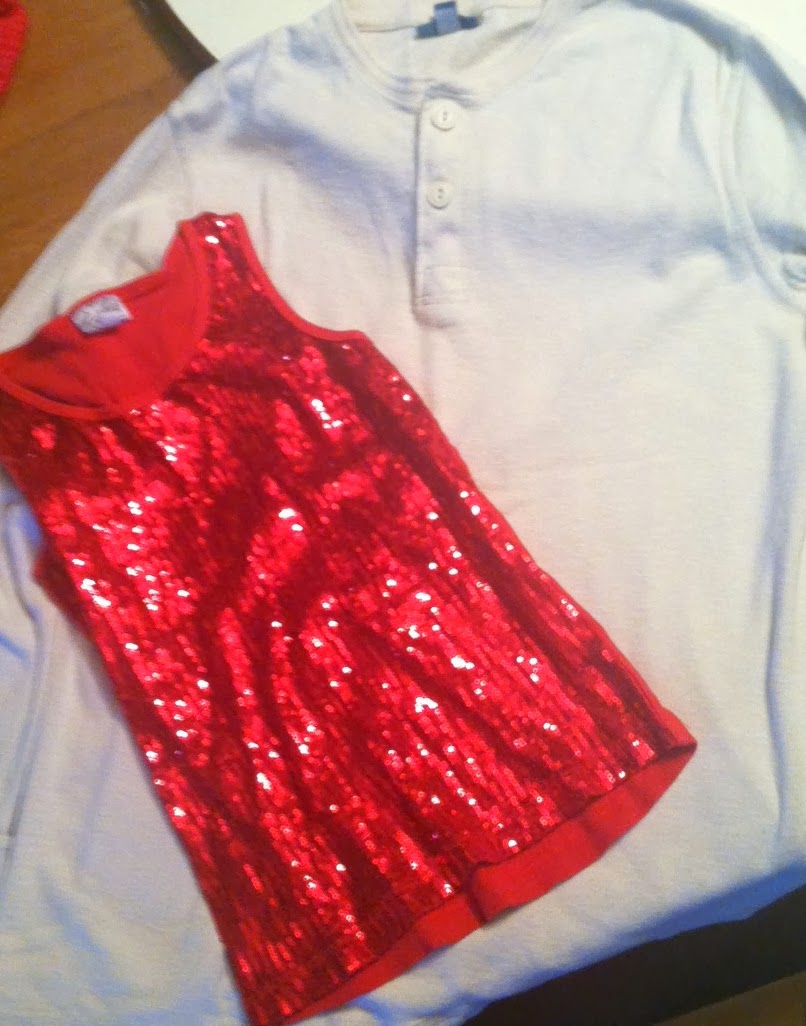
I had a Henley style shirt that I had never used, and I found a sequenced tank top that my daughter had outgrown.

 
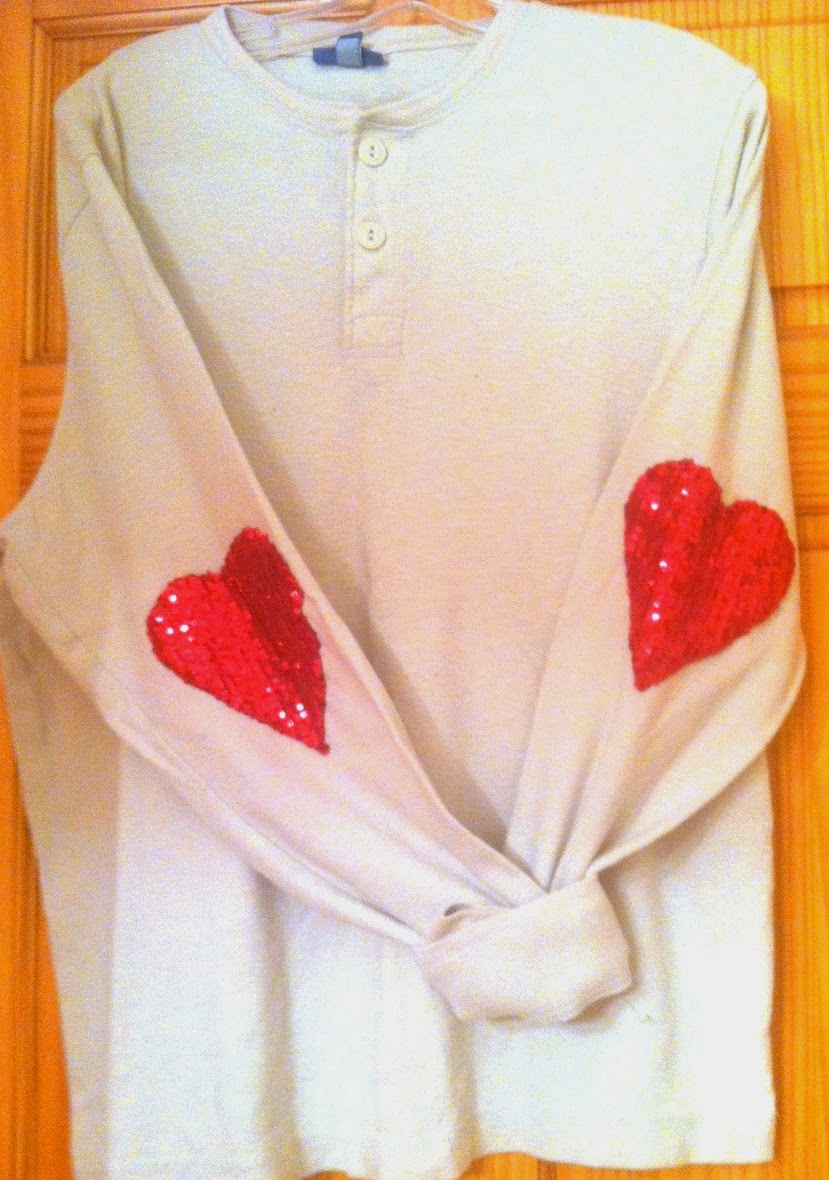
I put on the Henley shirt and marked the spot on the back of the arms where my elbows hit. Then, I cut two hearts out of the red sequence fabric. I used a heart shape cookie cutter and some chalk to draw my heart on the shirt so that both of them would be the same.
 
Then I just hand stitched the hearts centered over the marks I had made. (I did match the sleeves together to make sure the hearts would be even on the shirt.)
 
And I wound up with this!


I love it!!

I'm sure I could have used my sewing machine to put the hearts on, but I really didn't want to fight with the sleeves while doing it so I just stitched them on by hand.

Hooray!! I just love being able to use the things that I already have on hand to make something that's fabulous and new!

Wednesday, July 24, 2013

I took my husband's shirt

I did! I took it right out of his side of the closet and cut it up to make a shirt for me. When he saw what I was doing he was like, "Hey! Isn't that my shirt?" And I said, "Yes, it sure is!" And I don't even feel bad about it. Because, the truth is, he has never worn it and it's been hanging there for at least 3 years. So I decided to put it to good use and make something for myself.


I saw this shirt on Pinterest and I went and checked out the pattern and tutorial at Craft Habit.

Isn't it cute?

But, I wasn't starting with just fabric so I kind of had to just wing it......so mine doesn't really look like that either.

I started with this shirt, which I shopped from my closet (on my husband's side).


See, if you look on the edge of the table by the sleeve, you can see the price tag still attached. Three plus years is long enough to wait to see if he'll wear it!!

Anyway, I cut off the pocket and the buttons. Then I cut off the area where the buttons were, the area with the buttonholes, and the collar. I cut all of that off in one long strip. But I kept it around just in case.....and it's a good thing I did.

Here's the shirt after I cut that part off.


Then I tried it on and marked where I wanted the neckline to come to. I cut off the excess so that it was v-shaped then seamed it together all the way down the front.

Because I'm kind of a lazy crafter I decided to use the strip that I cut off the front of the shirt where the buttons had been as my facing along the neckline. It had been folded over and stitched so it would give me a finished edge on the inside too, so why not? And it worked out great!

Then, I tried the shirt on again and marked how much to take it in under the arms and along the side and also where to cut it off under the bust.

I stitched it up and cut off the excess on the sides and put a couple of tucks under the bust. (Oh, and did you know you can use a fork to make your tucks so that they're always the same? You can see the tutorial here. Genius!)

Then I took in the bottom of the shirt at an angle (the piece that I had cut off from under the bust) so that it fit to the bust line and got wider as it went down to the hips. This didn't take long at all and here's the finished project.


It was still a little loose when I got it finished (it made the bust line poofy) so I added a band from the side seams across the back to pull it in a little.

For that I used a piece of the strip of fabric I had cut off the front that had the button holes in it. To make it look finished I stitched some buttons on also, but they're really only there for looks. :0)


I was really please with how it turned out. Especially since I didn't have a pattern. Just an idea in my head sparked by that Pinterest find.


Wednesday, July 25, 2012

Old to New

I've seen other examples of this several places on the internet.

I had a print that had been done on a really heavy paper.


I stretched the print over some canvas stretchers. Then I used some vinyl letters I got at Target (money saving tip: I got the letters in the teacher supply section - across the aisle from the craft section - for about half the price of the stick on letters in the craft section and I got about twice as many letters.) to  put my chosen saying on it.

After that you paint the whole thing (I chose white) and let it dry. Then remove your letters.

I ended up with this:


I think that at the very top I'm going to attach a family picture. I chose my saying because that's how Dax and I met. I asked him to dance.

I wonder how often he questions his sanity for saying yes to that dance. LOL

Thursday, June 28, 2012

We've got bling

We spent the weekend getting some bling on at our house.

One of my daughters competes in pageants. She's only allowed to do 'natural pageants' because I'm not big on the fake hair, fake tan, fake teeth, etc. kind of pageants.

So, she's got a pageant coming up with the theme of denim and diamonds. There really aren't a lot of rules to go by which is really hard for me. I generally need some kind of parameters to operate in. Just wide open gives me too much room to go crazy with ideas. LOL

Anyway, since my daughter has to pay for her pageant participation on her own, she's learning a valuable lesson about learning to work with what you've got to save money.

With that in mind, I took a pair of boots that Kirsten has outgrown (but they still fit Addison) and added some bling.

These are the boots before:

After blinging up the boots, I also worked some magic on a belt that I have *ahem* outgrown.


She has a denim dress that she'll be wearing them with and her Dad is going to polish the foot part of the boots tonight.

I'm happy with the way they turned out and so is she. I can't wait to see what the other girls in the pageant show up with. I will say this though, I went through a WHOLE LOT of hot glue getting all of that done.

Tuesday, May 29, 2012

Flip flop dress up

I bought a pair of red flip flops some time back because they were on sale for less than a dollar. They were very plain and I knew I wanted to do something with them, but wasn't sure what.


I got a pair of flip flops for one of my daughters on whoopdwhoop and they inspired me.


I found some cute fabric and started with this...


 I tore my fabric into strips about one inch wide. I didn't measure, I just tore to make them look about the same. Also, I tore my strips because I wanted my flowers to be frayed on the edges.

Then, I ran a gathering stitch along one side and gathered the fabric up. I took that gathered fabric and formed a circle to make my flowers. I stitched them together on the back and then took tiny stitches through all of the layers so that they would stay in form. I used hot glue to attach a button in the center to cover my gathering stitches.


Then I hot glued them to the straps of my 'designer' flip flops. The red felt is to put on the underside of the straps and the flower just to give them a little extra support.

Here they are all done...


(don't let the shadows fool you, the flops are brand new)

I'm thrilled with the way they turned out. Do you think I can convince Dax that I need something new to wear with them?

Monday, November 9, 2009

Before & After

Well, I don't really have a 'before'. I forgot to take a picture until I had already started painting so I guess it's really a during & after.


When I was in the thrift store there was a little wooden sign that said 'no vacancy' on it. I paid $3 for it which is probably too much but it's one of the few times that I've looked at something and known exactly what I wanted to do with it so I paid the $3.


While I can certainly relate to the 'no vacancy' sentiment (since I usually feel like my house runneth over) I wanted to do something else with the sign.


Here's the during....


It started off an off white color.


As you can see, I painted the outside red. Awhile back, I bought some chalkboard contact paper. That's what I used for the center.


I haven't yet decided whether I want to distress it with some sandpaper or leave it like it is. What do you think?


I'm quite happy with it either way. Now, I can write what we're having for dinner instead of having to answer all four kids and the hubby individually. (They never ask when anyone else is around to hear the answer too so I have to keep answering the same question over and over. lol)

Thursday, July 23, 2009

Before + After

I know I haven't been around, much but I have been busy.


I've been re-doing Wyatt's bathroom.


Here it is before.


(don't you just love the 'stay out' in dripping blood that his grandmother gave him? hmmm... I wonder where is could have gotten off to.)


I've wanted to paint it for a long time but was a little scared because of the color I wanted to paint it.

Here's more what it looks like now.


As you can see I went with a dark blue. And, boy! was I even more scared when I put that first brush of paint on the wall. I had to do two coats but I am happy with it now that it's all done. I think it really sets off the woodwork and the tile around the bath.

I took down the towel holder above the toilet. It was so low you couldn't really use it for anything more than a hand towel or decoration. I replaced it with this cabinet. You can still only hang a hand towle or decoration but I got a little more storage space with this.


It was a white cabinet that I bought at Target. I spray painted it an off-white color to match the other things and replaced the knobs. I also put new knobs on the cabinet where the sink is and replaced the toilet paper holder.

I hung two of these on the little strip of wall between the tub and bathroom door (there are two doors into this tiny bathroom). I figure he can use these for his towels.


I have a bigger one that has three hooks on it that I'm going to hang behing the main door into the bathroom. I've got it all painted in the same off-white, and it's leaning behind the door. Now I just need to get it hung. :0)

Some of the decorative touches:


This little sign has always been in there but it shows up a lot better now.


I bought this jar at a junk shop (some would call it an antique shop but I really think she's just using the shop to clean all the 'crap' out of her own house which is right next door.) The top on it was white with flowers on it. I spray painted it red and really wasn't sure where I was going to use it. I finally decided to use it in Wyatt's bathroom and fill it with the little soaps from hotels. As you can see, it needs a lot more soap in it. Perhaps I can use that as a good excuse to do some more traveling. :0)


This is my favorite. It's a cross stitch thingy (don't really know what to call it) that I did years ago. I fell in love with the pattern when I saw it and made it long before we even had any kids. It just makes me giggle and that's my favorite way to decorate.

Now that I've got that pretty well taken care of, maybe I can get back to some of my other projects.

Sunday, June 7, 2009

Before + After

I was at the thrift store and bought some cute little plates and some candle holders.


A little super glue gel and now I have these:


I put one on the piano with some glass candies in it. I love it! They all turned out really cute. I'm going to have to stop doing this soon though because how many plates on stands does one person need? lol

Wednesday, May 13, 2009

Before + After

Today I was in Hobby Lobby (if you know me, that's no surprise) and they have a lot of things on sale for 50% off. I found a bunch of these:


Well, they actually had all of the letters. LOL


Anyway, I like it but didn't like that it's just glass. So I headed over to the scrapbooking section and picked out some paper. That turned it into this:


I like it much better. I also bought a couple of other 'v's that were also 50% off. I think I'll keep my eyes open for others to make a whole little collection of them.

Here's what I have so far.