So, I found this cute little sweater and thought it would make a great pillow for Valentine's Day.
Showing posts with label upcycle. Show all posts
Thursday, February 4, 2016
From sweater to pillow
Some time ago I watched a video where the speaker was talking about finding usable fabric in unusual places. Since I live in a small town and fabric stores are few, I took this to heart. When I'm out at the thrift stores, I look at things a little differently now.
Labels:
hearts,
old to new,
pillow,
quick sewing,
recycle,
upcycle,
valentine
Saturday, February 28, 2015
Upcycled pin cushion
How cute is this tiny little pin cushion?
It's only about 2 inches tall by 3 inches wide.
I used a little cup that I filled with ground walnut shells (to help sharpen pins) and glued a little puff filled with fiber fill. I lined under the fabric with a piece of felt to help hold the pins in place.
I just can't get over how cute it turned out! I've got several more little containers to work with and can't wait to see how they turn out.
Labels:
pin cushion,
recycle,
sewing,
supplies,
upcycle
Friday, February 20, 2015
Thursday, January 1, 2015
Recycling I like
I know that most often when people talk of recycling, it's just aloud putting your stuff into the correct bin and assuming that it's being taken off to be torn down and the reused. I prefer taking something I have and making it into something new myself. That way I know what happened to it.
I am pretty happy with the outcome. That's the way I like to recycle. It's much prettier than it started out being.
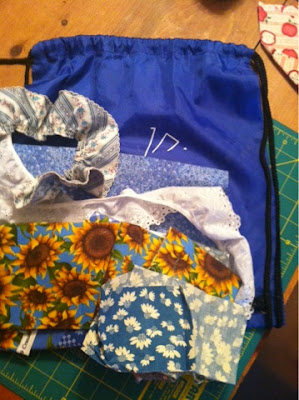
One of my kids had received a nylon backpack at a music festival that she participated in. It's not the kind if thing that she was going to use. So, after it sat around here for eons, I finally decided to so something with it.
I gathered up material in coordinating blues.....

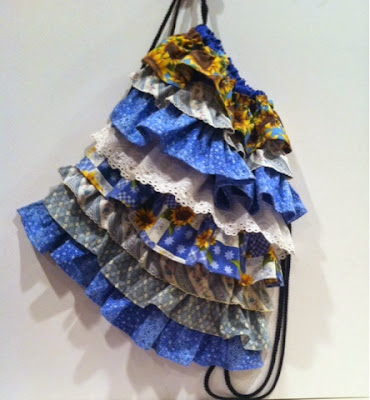
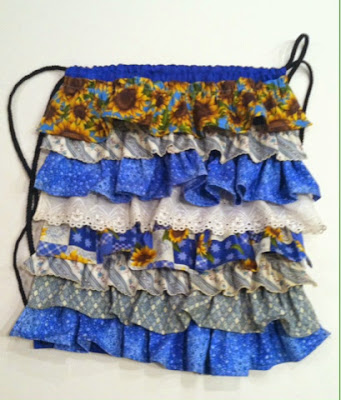
Cut my fabrics into a bunch of strips which which I then gathered and sewed onto my backpack in layers. To make this easy, I advise that you start at the bottom and work your way to the top.
Here's the finished product...


I am pretty happy with the outcome. That's the way I like to recycle. It's much prettier than it started out being.
Wednesday, July 2, 2014
Upcycled overalls
I started these forever ago. I put them away (probably because people were coming to my house) and then promptly forgot about them. I recently came across them again and finished them.
I just love them!!
I used a page from a children's coloring book as the basis for my pattern. I think that's a great place to find things to pattern off of.....especially the ones for younger children because they're big and simple.
I can't believe I forgot about having these because I was almost finished with them when I had to put them away. It probably took me all of 10-15 minutes to get them done. Sheesh!!
I just love them!!
Here's a close up of the face I put on the bib part:
I used a page from a children's coloring book as the basis for my pattern. I think that's a great place to find things to pattern off of.....especially the ones for younger children because they're big and simple.
I can't believe I forgot about having these because I was almost finished with them when I had to put them away. It probably took me all of 10-15 minutes to get them done. Sheesh!!
Thursday, May 1, 2014
Upcycled Bird Feeder
With all the eggs we used around here for Easter, I had plenty of empty egg cartons on hand. I wanted to do something with them instead of just throwing them away.
Here's what I came up with.....
I started with an empty egg carton and cut the lid off.
Then I cut it into a smaller size....
I poked holes in the mid-point on each side and ran some nylon cord through. I decided to use the mid-point because I ran the cord underneath all the way across. I hoped that would give it more stability.
Then I tied the cords together at the top, filled it with wild bird food, and hung it from a tree out front.
Pretty simple stuff. That makes it a great craft to do with young children.
I love it when I can use stuff I already have to make something new. And this time, the birds love it too.
Here's what I came up with.....
I started with an empty egg carton and cut the lid off.
Then I cut it into a smaller size....
I poked holes in the mid-point on each side and ran some nylon cord through. I decided to use the mid-point because I ran the cord underneath all the way across. I hoped that would give it more stability.
Then I tied the cords together at the top, filled it with wild bird food, and hung it from a tree out front.
Pretty simple stuff. That makes it a great craft to do with young children.
Labels:
bird feeder,
crafts for kids,
recycle,
simple crafts,
upcycle
Friday, March 21, 2014
One man's trash......
Once again time has gotten away from me and I haven't posted in ages. Life around here has been somewhat crazy recently and emotionally exhausting. I think things are on their way back to normal.....well, what's normal for us during tax season, anyway.
It's been a few weeks, but I made a new tote bag.
As you can see, I made it from an empty dog food bag. It's one of those nylon type bags so that makes it nice and sturdy and water resistant. I used a 40+ pound dog food bag so it's a large tote which is great. I'm hoping to use it to hold towels during a trip to the beach this summer. :0)
We have 5 dogs (3 of them are very large dogs) so we go through a bag like this about every 10 days. That's a lot of bags and I'm glad I found a way to use them again (and again.) But, since I can only use so many tote bags, I made a listing on etsy. But, now I have other ideas swirling in my head on other things to make. I just have to find the time to get them done.
Labels:
quick and easy,
quick sewing,
recycle,
totes,
upcycle
Thursday, February 20, 2014
Shirt Upcycle
I saw a really cute shirt on Craft Gossip or so I thought. I went back to look for it so that I could include a link in this post but couldn't find it.
Anyway, here's what I did.
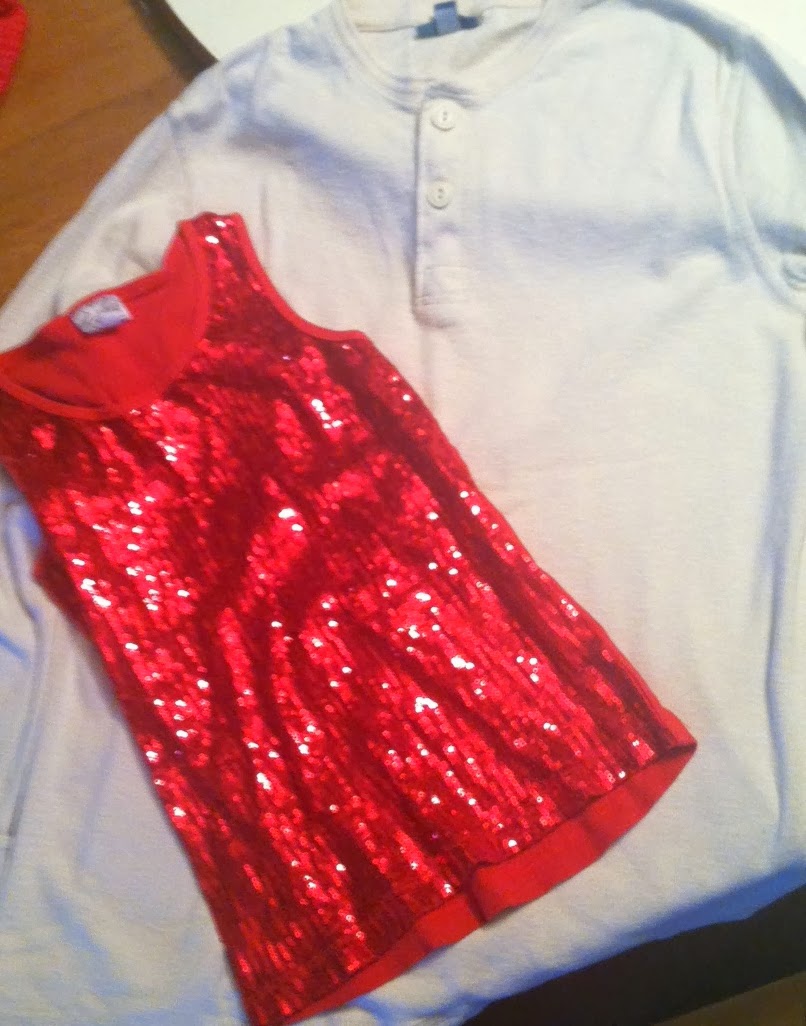
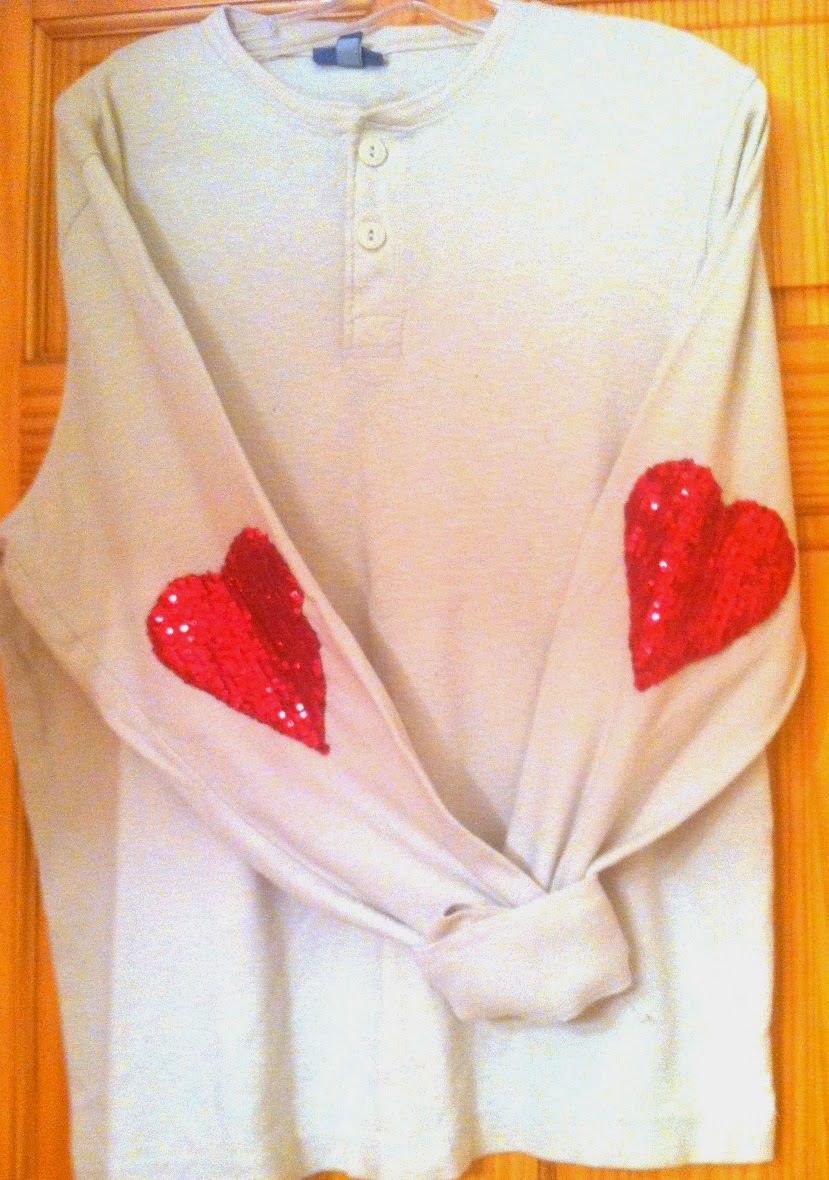
I had a Henley style shirt that I had never used, and I found a sequenced tank top that my daughter had outgrown.
I love it!!
I'm sure I could have used my sewing machine to put the hearts on, but I really didn't want to fight with the sleeves while doing it so I just stitched them on by hand.
Hooray!! I just love being able to use the things that I already have on hand to make something that's fabulous and new!
Anyway, here's what I did.
I had a Henley style shirt that I had never used, and I found a sequenced tank top that my daughter had outgrown.

I put on the Henley shirt and marked the spot on the back of the arms where my elbows hit. Then, I cut two hearts out of the red sequence fabric. I used a heart shape cookie cutter and some chalk to draw my heart on the shirt so that both of them would be the same.
Then I just hand stitched the hearts centered over the marks I had made. (I did match the sleeves together to make sure the hearts would be even on the shirt.)
And I wound up with this!

I love it!!
I'm sure I could have used my sewing machine to put the hearts on, but I really didn't want to fight with the sleeves while doing it so I just stitched them on by hand.
Hooray!! I just love being able to use the things that I already have on hand to make something that's fabulous and new!
Labels:
before and after,
clothes,
quick and easy,
quick sewing,
upcycle
Tuesday, September 17, 2013
Made over Tee
I can't believe that once again it has been forever since I posted!! School for the kids has already been a little crazy. We're all still getting used to the fact that they are now in high school. Them because they have a whole new set of responsibilities and expectations. And me because, well....my babies are freaking in high school! How does that happen so fast?!
So far in the three weeks since school has started there have been three colds, two cases of chiggers, and one sports injury. Hoping that the next three weeks are better!
Anyway, all of that to say that I'm staying busy, but having a hard time finding the time to blog. I have had a few orders to ship out so that's been a good thing.
I also made myself a new shirt. I started with a teal colored t-shirt. I cut out the neckline and cut the sleeves to be more flattering. Then I drew a flower near the neckline with chalk. I pinned a grey piece of jersey knit (I cut it off of a t-shirt that was destined for the rag pile) and stitched over my chalk lines by hand using a big straight stitch. Then I went back and cut away the top layer of fabric to form my petals.
I really like the way it turned out. I'll have to come up with some more designs and make others.
So far in the three weeks since school has started there have been three colds, two cases of chiggers, and one sports injury. Hoping that the next three weeks are better!
Anyway, all of that to say that I'm staying busy, but having a hard time finding the time to blog. I have had a few orders to ship out so that's been a good thing.
I also made myself a new shirt. I started with a teal colored t-shirt. I cut out the neckline and cut the sleeves to be more flattering. Then I drew a flower near the neckline with chalk. I pinned a grey piece of jersey knit (I cut it off of a t-shirt that was destined for the rag pile) and stitched over my chalk lines by hand using a big straight stitch. Then I went back and cut away the top layer of fabric to form my petals.
I really like the way it turned out. I'll have to come up with some more designs and make others.
Wednesday, July 24, 2013
I took my husband's shirt
I did! I took it right out of his side of the closet and cut it up to make a shirt for me. When he saw what I was doing he was like, "Hey! Isn't that my shirt?" And I said, "Yes, it sure is!" And I don't even feel bad about it. Because, the truth is, he has never worn it and it's been hanging there for at least 3 years. So I decided to put it to good use and make something for myself.
I saw this shirt on Pinterest and I went and checked out the pattern and tutorial at Craft Habit.
Isn't it cute?
But, I wasn't starting with just fabric so I kind of had to just wing it......so mine doesn't really look like that either.
I started with this shirt, which I shopped from my closet (on my husband's side).
See, if you look on the edge of the table by the sleeve, you can see the price tag still attached. Three plus years is long enough to wait to see if he'll wear it!!
Anyway, I cut off the pocket and the buttons. Then I cut off the area where the buttons were, the area with the buttonholes, and the collar. I cut all of that off in one long strip. But I kept it around just in case.....and it's a good thing I did.
Here's the shirt after I cut that part off.
Then I tried it on and marked where I wanted the neckline to come to. I cut off the excess so that it was v-shaped then seamed it together all the way down the front.
Because I'm kind of a lazy crafter I decided to use the strip that I cut off the front of the shirt where the buttons had been as my facing along the neckline. It had been folded over and stitched so it would give me a finished edge on the inside too, so why not? And it worked out great!
Then, I tried the shirt on again and marked how much to take it in under the arms and along the side and also where to cut it off under the bust.
I stitched it up and cut off the excess on the sides and put a couple of tucks under the bust. (Oh, and did you know you can use a fork to make your tucks so that they're always the same? You can see the tutorial here. Genius!)
Then I took in the bottom of the shirt at an angle (the piece that I had cut off from under the bust) so that it fit to the bust line and got wider as it went down to the hips. This didn't take long at all and here's the finished project.
It was still a little loose when I got it finished (it made the bust line poofy) so I added a band from the side seams across the back to pull it in a little.
For that I used a piece of the strip of fabric I had cut off the front that had the button holes in it. To make it look finished I stitched some buttons on also, but they're really only there for looks. :0)
I was really please with how it turned out. Especially since I didn't have a pattern. Just an idea in my head sparked by that Pinterest find.
I saw this shirt on Pinterest and I went and checked out the pattern and tutorial at Craft Habit.
Isn't it cute?
But, I wasn't starting with just fabric so I kind of had to just wing it......so mine doesn't really look like that either.
I started with this shirt, which I shopped from my closet (on my husband's side).
See, if you look on the edge of the table by the sleeve, you can see the price tag still attached. Three plus years is long enough to wait to see if he'll wear it!!
Anyway, I cut off the pocket and the buttons. Then I cut off the area where the buttons were, the area with the buttonholes, and the collar. I cut all of that off in one long strip. But I kept it around just in case.....and it's a good thing I did.
Here's the shirt after I cut that part off.
Then I tried it on and marked where I wanted the neckline to come to. I cut off the excess so that it was v-shaped then seamed it together all the way down the front.
Because I'm kind of a lazy crafter I decided to use the strip that I cut off the front of the shirt where the buttons had been as my facing along the neckline. It had been folded over and stitched so it would give me a finished edge on the inside too, so why not? And it worked out great!
Then, I tried the shirt on again and marked how much to take it in under the arms and along the side and also where to cut it off under the bust.
I stitched it up and cut off the excess on the sides and put a couple of tucks under the bust. (Oh, and did you know you can use a fork to make your tucks so that they're always the same? You can see the tutorial here. Genius!)
Then I took in the bottom of the shirt at an angle (the piece that I had cut off from under the bust) so that it fit to the bust line and got wider as it went down to the hips. This didn't take long at all and here's the finished project.
It was still a little loose when I got it finished (it made the bust line poofy) so I added a band from the side seams across the back to pull it in a little.
For that I used a piece of the strip of fabric I had cut off the front that had the button holes in it. To make it look finished I stitched some buttons on also, but they're really only there for looks. :0)
I was really please with how it turned out. Especially since I didn't have a pattern. Just an idea in my head sparked by that Pinterest find.
Wednesday, July 10, 2013
Ugly Christmas Sweater Gift
A few years ago I bout a Christmas sweater at Goodwill for the sole purpose of making a pillow with it. Well, since then my mother-in-law has been trying to sneak it out of the house and take it home with her. I've been looking like crazy to find another one but since people started having ugly Christmas sweater parties it's almost impossible to find one. But, that's because I was always looking when it was close to Christmas. I finally found one but it was in early June.
So, I took this sweater....
And made this pillow.....
She's going to be so happy when I give it to her.
It's really just a pillow cover because I left all of the buttons in tact and operational so she can just unbutton the sweater and take the pillow out if she needs to. It's also very quick and easy to make. I didn't have to take in the sides of the sweater at all so all I did was cut it off at the top, turn it inside out and stitch the top and bottom closed. I turned it back to right side out, inserted the pillow, and buttoned it back up. Piece of cake!!
So, I took this sweater....
And made this pillow.....
She's going to be so happy when I give it to her.
It's really just a pillow cover because I left all of the buttons in tact and operational so she can just unbutton the sweater and take the pillow out if she needs to. It's also very quick and easy to make. I didn't have to take in the sides of the sweater at all so all I did was cut it off at the top, turn it inside out and stitch the top and bottom closed. I turned it back to right side out, inserted the pillow, and buttoned it back up. Piece of cake!!
Labels:
gifts,
quick and easy,
quick sewing,
refashion,
upcycle
Friday, June 7, 2013
I can fix that!
So, some time back I bought this shirt online and once it arrived it was too tight in the bodice so I gave it to my daughters. They decided that they like the shirt, but not the long sleeves.
Somewhere around the same time I also bought these pants on ebay. When they arrived I found that the flare in the legs was pretty major.....like I couldn't see my feet at all.
So, I was trying to decide how to take in the flare on the jeans because the seams on the inside of the leg and the outside are finished off and anything I did would be noticeable.
Then one day an idea struck me and I decided how to make things work out so that we would all be happy. I did the only logical thing. I cut the sleeves off on the shirt and the flares off on the pants. Woohoo!
I hemmed the sleeves on the shirt. Done! And the girls are happy with it.
I just have to add here that every time I use my sewing machine my husband gets a whole new set of brownie points for buying it for me!!
Just look at the beautiful job it did when I hemmed the sleeves on this sheer fabric!!
I took the lace that was in the middle of the sleeve and down at the cuff and separated it from the fabric. Then I stitched it together in one long strip.
I turned up the raw edge on the jeans (with right sides touching) and stitched the lace around the bottom and again around the top of the lace.
Ta-dah!! New capris.
And they're cute too!!
So now we're all happy.
I love it when I can take the things I am unhappy with and turn them into things that I AM happy with.
Somewhere around the same time I also bought these pants on ebay. When they arrived I found that the flare in the legs was pretty major.....like I couldn't see my feet at all.
So, I was trying to decide how to take in the flare on the jeans because the seams on the inside of the leg and the outside are finished off and anything I did would be noticeable.
Then one day an idea struck me and I decided how to make things work out so that we would all be happy. I did the only logical thing. I cut the sleeves off on the shirt and the flares off on the pants. Woohoo!
I hemmed the sleeves on the shirt. Done! And the girls are happy with it.
I just have to add here that every time I use my sewing machine my husband gets a whole new set of brownie points for buying it for me!!
Just look at the beautiful job it did when I hemmed the sleeves on this sheer fabric!!
I took the lace that was in the middle of the sleeve and down at the cuff and separated it from the fabric. Then I stitched it together in one long strip.
I turned up the raw edge on the jeans (with right sides touching) and stitched the lace around the bottom and again around the top of the lace.
Ta-dah!! New capris.
And they're cute too!!
So now we're all happy.
I love it when I can take the things I am unhappy with and turn them into things that I AM happy with.
Labels:
quick and easy,
quick sewing,
refashion,
upcycle
Wednesday, January 16, 2013
That covers it
Two of my daughters share a bedroom. Kirsten loves zebra print and has been wanting that in their bedroom for some time. Addison, on the other hand, doesn't want it at all. Since Kirsten always gives in on these things I decided it was time for her to have her way.
But, I did still take Addison into consideration and decided not to go hog wild with the zebra print.
Last year Dax's mom had given me a black comforter set (which doesn't match anything in my bedroom) but it was a good deal. Anyway, it's a king size comforter and the girls have twin size beds. Also, because they're loft beds I didn't want something that hung way down on the sides. I measured their beds and the comforter and cutting it in half would work perfectly.
So, I gathered yards and yards of zebra print fabric and stitched it to half of that king size comforter. I topped that with some wide, hot pink rick-rack.
And, I ended up with this:
I gave Kirsten a set of sheets in a matching zebra print and Addison got a set in hot pink with white polka dots. This way, they're both happy. Score!!
Now, I do have to mention that I way underestimated how much fabric it would take to put a ruffle around two twin comforters so I originally only ordered enough to make it around one. When my second order of fabric arrived, my girls (as usual) were being nosy so I had to hide the package from them. Guess what I still can't find. Sooooo, I only have one comforter completed and the other is on hold until I can find my magic hiding place. I should probably ask the girls to look.....it would likely only take minutes for them to find it. LOL
But, I did still take Addison into consideration and decided not to go hog wild with the zebra print.
Last year Dax's mom had given me a black comforter set (which doesn't match anything in my bedroom) but it was a good deal. Anyway, it's a king size comforter and the girls have twin size beds. Also, because they're loft beds I didn't want something that hung way down on the sides. I measured their beds and the comforter and cutting it in half would work perfectly.
So, I gathered yards and yards of zebra print fabric and stitched it to half of that king size comforter. I topped that with some wide, hot pink rick-rack.
And, I ended up with this:
I gave Kirsten a set of sheets in a matching zebra print and Addison got a set in hot pink with white polka dots. This way, they're both happy. Score!!
Now, I do have to mention that I way underestimated how much fabric it would take to put a ruffle around two twin comforters so I originally only ordered enough to make it around one. When my second order of fabric arrived, my girls (as usual) were being nosy so I had to hide the package from them. Guess what I still can't find. Sooooo, I only have one comforter completed and the other is on hold until I can find my magic hiding place. I should probably ask the girls to look.....it would likely only take minutes for them to find it. LOL
Tuesday, November 13, 2012
Upcycled Clothes
I took a couple of items and made a new shirt.
Here's what I started with:
A purple t-shirt and a pair of long women's socks.
I cut the foot part off of the socks, turned them upside down and sewed the edge inside the sleeve hem.
I also cut a diamond from an old white t-shirt and attached it to the lower right hand side of the shirt and took some matching orange thread and stitched it across (like the white diamonds on the socks.)
I ended up with this:
(I know it's hard to see the stitching in the picture, but I assure you it's orange and it's there. lol)
Anyway, I'm really happy with it. It turned out really cute and I don't think anyone would actually think it's a pair of socks.
Here's what I started with:
A purple t-shirt and a pair of long women's socks.
I cut the foot part off of the socks, turned them upside down and sewed the edge inside the sleeve hem.
I also cut a diamond from an old white t-shirt and attached it to the lower right hand side of the shirt and took some matching orange thread and stitched it across (like the white diamonds on the socks.)
I ended up with this:
(I know it's hard to see the stitching in the picture, but I assure you it's orange and it's there. lol)
Anyway, I'm really happy with it. It turned out really cute and I don't think anyone would actually think it's a pair of socks.
Monday, October 1, 2012
New bracelet from trash
The girls and I had some fun playing with some of the trash from the office. We have a candy dish at the office and I keep the good stuff in there--the fun size candy bars. I saved up several of the wrappers that didn't get all torn to pieces when they were opened.
I put them on parchment paper in the oven at 300F for just a few seconds (probably about 30-45) and shrunk them down.
Keep a close eye on them because once they start to shrink, it happens fast.
After it shrunk down (it was less than half it's starting size) and cooled, I punched holes with a small hole punch and put a black chain on it.
The daughter wearing it thinks it's the coolest thing ever....and I'm good with that.
I left some in too long and they got really small. I liked that but the stuck to the paper in weird spots and couldn't be read any longer, so I may try again and see if I can get them small enough to make charms.
Who knew trash could be so much fun? Besides, if clients don't come in and eat the candy, I'll just have to do it.....in the name of art, of course.
I put them on parchment paper in the oven at 300F for just a few seconds (probably about 30-45) and shrunk them down.
Keep a close eye on them because once they start to shrink, it happens fast.
After it shrunk down (it was less than half it's starting size) and cooled, I punched holes with a small hole punch and put a black chain on it.
The daughter wearing it thinks it's the coolest thing ever....and I'm good with that.
I left some in too long and they got really small. I liked that but the stuck to the paper in weird spots and couldn't be read any longer, so I may try again and see if I can get them small enough to make charms.
Who knew trash could be so much fun? Besides, if clients don't come in and eat the candy, I'll just have to do it.....in the name of art, of course.
Wednesday, July 25, 2012
Old to New
I've seen other examples of this several places on the internet.
I had a print that had been done on a really heavy paper.
I stretched the print over some canvas stretchers. Then I used some vinyl letters I got at Target (money saving tip: I got the letters in the teacher supply section - across the aisle from the craft section - for about half the price of the stick on letters in the craft section and I got about twice as many letters.) to put my chosen saying on it.
After that you paint the whole thing (I chose white) and let it dry. Then remove your letters.
I ended up with this:
I think that at the very top I'm going to attach a family picture. I chose my saying because that's how Dax and I met. I asked him to dance.
I wonder how often he questions his sanity for saying yes to that dance. LOL
Tuesday, July 3, 2012
Upcycled Goodies
I have three teenage daughters which means we have lots of hair accessories. They all share one bathroom which usually looks like a tornado has been through it. I'm always looking for any small way to help contain some of the mess.
Somewhere or another, I saw a container made from a used chips can and decided I could do something similar with a recently emptied oatmeal container. I headed to Hobby Lobby and bought a couple of sheets of 12 X 12 paper and then dug out my bottle of mod podge.

I coated up the oatmeal container with mod podge and wrapped the paper around it. I only did a little at a time to help keep the mess to a minimum.
After I got the container covered and gave it time to dry, I folded a little part along the bottom under and glued it into place to give the whole thing a cleaner look. I also cut a circle from the paper to cover the center of the lid.
The purpose here is for the girls to put their hair clips and pony tail holders inside the container and head bands fit perfectly on the outside.
Here's the finished product.
I hope they'll actually use it. LOL
Thursday, June 28, 2012
We've got bling
We spent the weekend getting some bling on at our house.
One of my daughters competes in pageants. She's only allowed to do 'natural pageants' because I'm not big on the fake hair, fake tan, fake teeth, etc. kind of pageants.
So, she's got a pageant coming up with the theme of denim and diamonds. There really aren't a lot of rules to go by which is really hard for me. I generally need some kind of parameters to operate in. Just wide open gives me too much room to go crazy with ideas. LOL
Anyway, since my daughter has to pay for her pageant participation on her own, she's learning a valuable lesson about learning to work with what you've got to save money.
With that in mind, I took a pair of boots that Kirsten has outgrown (but they still fit Addison) and added some bling.
These are the boots before:
After blinging up the boots, I also worked some magic on a belt that I have *ahem* outgrown.
She has a denim dress that she'll be wearing them with and her Dad is going to polish the foot part of the boots tonight.
I'm happy with the way they turned out and so is she. I can't wait to see what the other girls in the pageant show up with. I will say this though, I went through a WHOLE LOT of hot glue getting all of that done.
One of my daughters competes in pageants. She's only allowed to do 'natural pageants' because I'm not big on the fake hair, fake tan, fake teeth, etc. kind of pageants.
So, she's got a pageant coming up with the theme of denim and diamonds. There really aren't a lot of rules to go by which is really hard for me. I generally need some kind of parameters to operate in. Just wide open gives me too much room to go crazy with ideas. LOL
Anyway, since my daughter has to pay for her pageant participation on her own, she's learning a valuable lesson about learning to work with what you've got to save money.
With that in mind, I took a pair of boots that Kirsten has outgrown (but they still fit Addison) and added some bling.
These are the boots before:
After blinging up the boots, I also worked some magic on a belt that I have *ahem* outgrown.
She has a denim dress that she'll be wearing them with and her Dad is going to polish the foot part of the boots tonight.
I'm happy with the way they turned out and so is she. I can't wait to see what the other girls in the pageant show up with. I will say this though, I went through a WHOLE LOT of hot glue getting all of that done.
Saturday, June 2, 2012
Saved from the trash part 2
I don't have a lot of these laying around because we don't drink wine. But I do use it for cooking so every now and then I have a bottle to use for something.
I've seen pictures around of the bottles wrapped with twine to use as a vase and I decided to give it a try with this one.
I only had very thin twine. I don't recommend it! LOL
Anyway, because of the very thin twin, I decided to just cover the part of the bottle where the label is. I just dotted hot glue here and there to hold it in place rather than trying to do the whole thing.
I think it turned out cute and a little rustic looking (and rustic totally goes with most of my house.) Now I can't wait to buy myself some flowers and use it.
Thursday, May 31, 2012
Saved from the trash
During the school year I make lunches for my kids everyday. I don't think they've bought their lunch even once since they started at the Jr. High two years ago.
As you can imagine, we go through quite a few of these.
I hate throwing away these big plastic containers so I try to find something else to do with them.
I'm starting to run out of things to put in them quite frankly. So, I've been wanting to try growing some sweet potatoes and the other day it finally hit me that I could cut the top off of these and use them. They're plenty deep enough.
See...
The reason I've been trying to figure something out is because I needed it to be a container that was in the house. Even though we live on 5 acres and the back yard is fenced separately from the rest of the acreage, we have a doberman that climbs over that fence and uses anything he can find int he front to play with. If I tried to plant anything out there, he would have it torn up in a matter of minutes. Leaving wet or muddy shoes on the porch to dry isn't an option either. Those are some of his favorite things to play with.
Hopefully I can keep the cats inside the house from eating the plants.
It's all just a juggling act isn't it?
As you can imagine, we go through quite a few of these.
I hate throwing away these big plastic containers so I try to find something else to do with them.
I'm starting to run out of things to put in them quite frankly. So, I've been wanting to try growing some sweet potatoes and the other day it finally hit me that I could cut the top off of these and use them. They're plenty deep enough.
See...
The reason I've been trying to figure something out is because I needed it to be a container that was in the house. Even though we live on 5 acres and the back yard is fenced separately from the rest of the acreage, we have a doberman that climbs over that fence and uses anything he can find int he front to play with. If I tried to plant anything out there, he would have it torn up in a matter of minutes. Leaving wet or muddy shoes on the porch to dry isn't an option either. Those are some of his favorite things to play with.
Hopefully I can keep the cats inside the house from eating the plants.
It's all just a juggling act isn't it?
Subscribe to:
Posts (Atom)