Showing posts with label quick sewing. Show all posts

Thursday, February 4, 2016

From sweater to pillow

Some time ago I watched a video where the speaker was talking about finding usable fabric in unusual places. Since I live in a small town and fabric stores are few, I took this to heart. When I'm out at the thrift stores, I look at things a little differently now. 

So, I found this cute little sweater and thought it would make a great pillow for Valentine's Day.


I left the side seams in, cut off the top (including sleeves), stitched the top and bottom closed, and stuffed that baby. 

I think it turned out pretty cute......if I do say so myself.


It's a lot fun to look at things a little differently. Give it a try.

Wednesday, October 29, 2014

A Halloween Finish

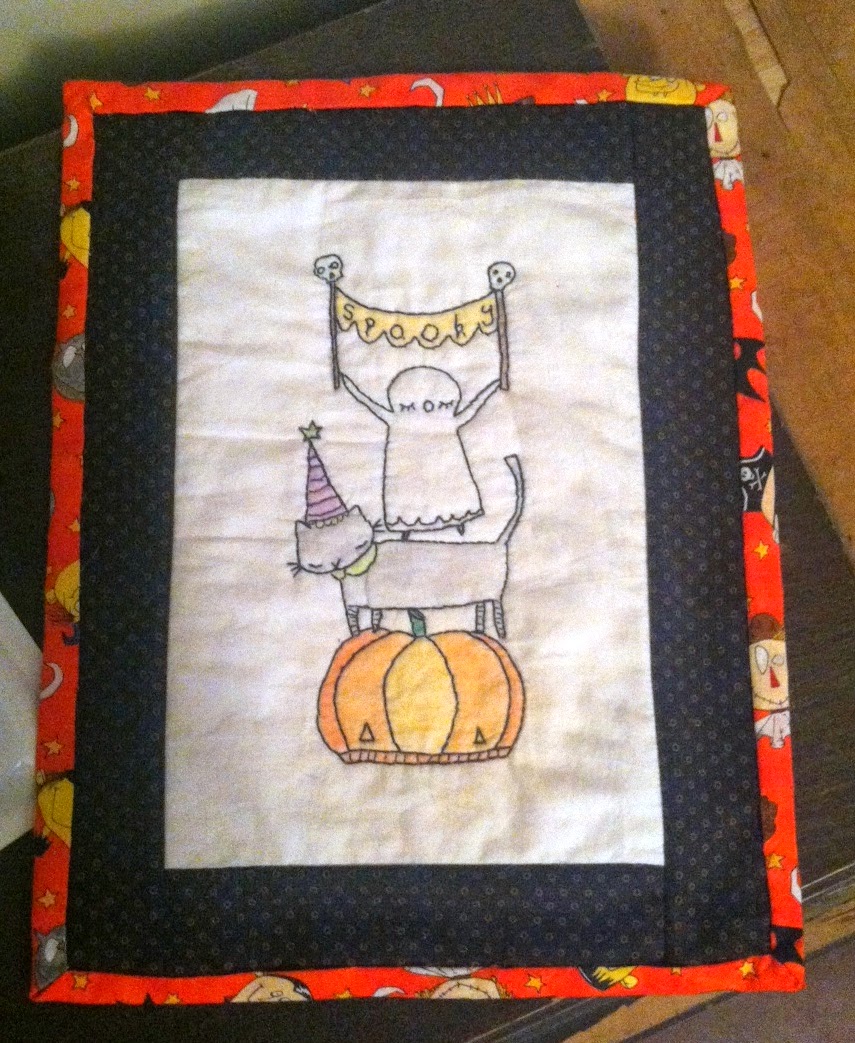
I did this stitchery some time ago and then never did anything with it.

I recently came across it and actually had some Halloween fabric to use with it.

So, Hooray!! I got something completed. lol


I used the backing fabric to wrap around and make the binding on the front. I'm not sure if I'll leave it like it is or if I'll add some buttons in the corners or something like that to jazz it up.

If you'd like to stitch one for yourself, you can find the free pattern at Feeling Stitchy. I used crayons to color in my stitching and then ironed (with a cloth covering the colored portions) to set the color.

It's a great way to add even more depth to your stitching.

Friday, March 21, 2014

One man's trash......

Once again time has gotten away from me and I haven't posted in ages. Life around here has been somewhat crazy recently and emotionally exhausting. I think things are on their way back to normal.....well, what's normal for us during tax season, anyway.

It's been a few weeks, but I made a new tote bag.


As you can see, I made it from an empty dog food bag. It's one of those nylon type bags so that makes it nice and sturdy and water resistant. I used a 40+ pound dog food bag so it's a large tote which is great. I'm hoping to use it to hold towels during a trip to the beach this summer. :0)
 
We have 5 dogs (3 of them are very large dogs) so we go through a bag like this about every 10 days. That's a lot of bags and I'm glad I found a way to use them again (and again.) But, since I can only use so many tote bags, I made a listing on etsy. But, now I have other ideas swirling in my head on other things to make. I just have to find the time to get them done.

Thursday, February 20, 2014

Shirt Upcycle

I saw a really cute shirt on Craft Gossip or so I thought. I went back to look for it so that I could include a link in this post but couldn't find it.

Anyway, here's what I did.

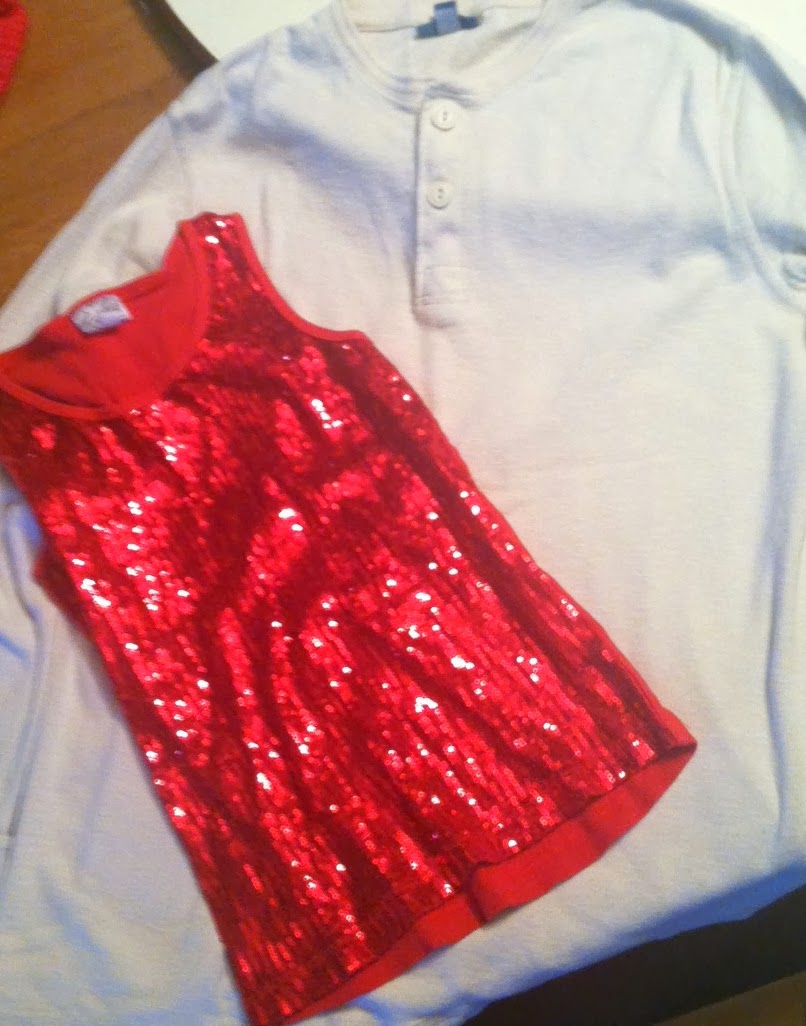
I had a Henley style shirt that I had never used, and I found a sequenced tank top that my daughter had outgrown.

 
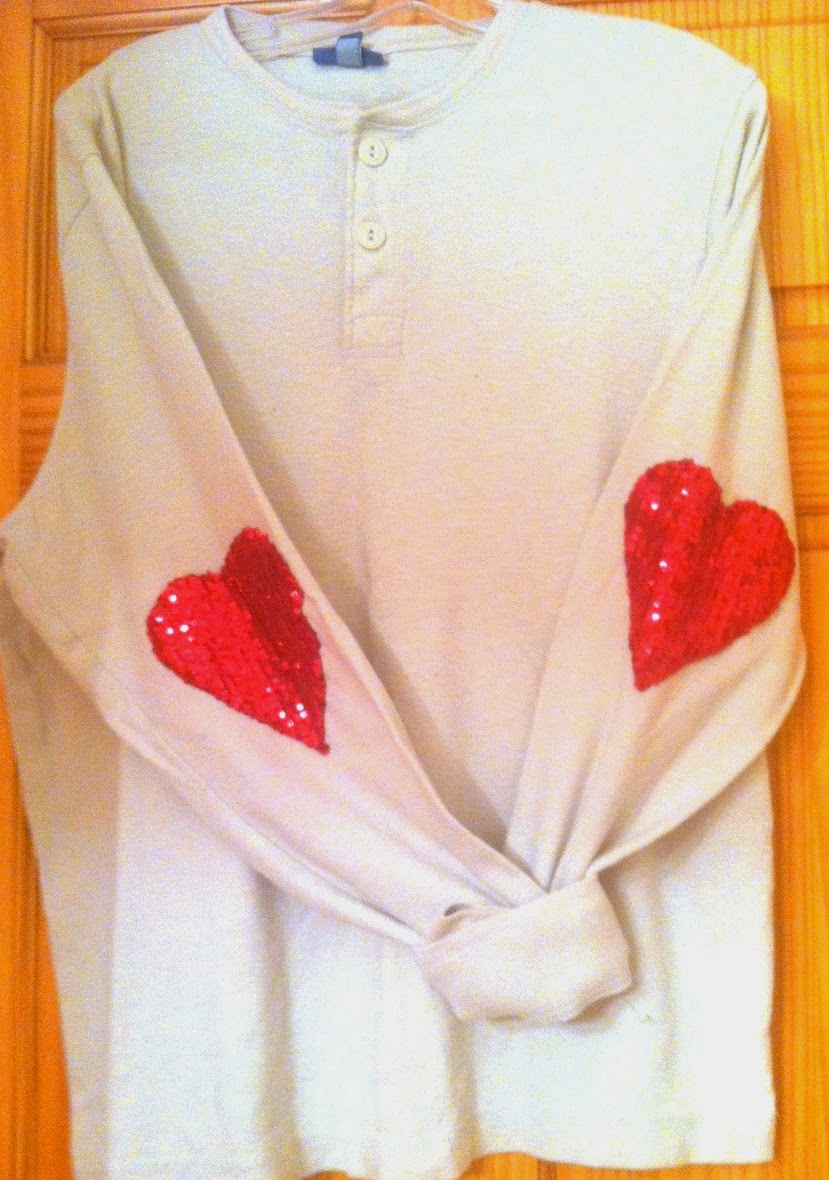
I put on the Henley shirt and marked the spot on the back of the arms where my elbows hit. Then, I cut two hearts out of the red sequence fabric. I used a heart shape cookie cutter and some chalk to draw my heart on the shirt so that both of them would be the same.
 
Then I just hand stitched the hearts centered over the marks I had made. (I did match the sleeves together to make sure the hearts would be even on the shirt.)
 
And I wound up with this!


I love it!!

I'm sure I could have used my sewing machine to put the hearts on, but I really didn't want to fight with the sleeves while doing it so I just stitched them on by hand.

Hooray!! I just love being able to use the things that I already have on hand to make something that's fabulous and new!

Wednesday, July 10, 2013

Ugly Christmas Sweater Gift

A few years ago I bout a Christmas sweater at Goodwill for the sole purpose of making a pillow with it. Well, since then my mother-in-law has been trying to sneak it out of the house and take it home with her. I've been looking like crazy to find another one but since people started having ugly Christmas sweater parties it's almost impossible to find one. But, that's because I was always looking when it was close to Christmas. I finally found one but it was in early June.

So, I took this sweater....


And made this pillow.....


She's going to be so happy when I give it to her.

It's really just a pillow cover because I left all of the buttons in tact and operational so she can just unbutton the sweater and take the pillow out if she needs to. It's also very quick and easy to make. I didn't have to take in the sides of the sweater at all so all I did was cut it off at the top, turn it inside out and stitch the top and bottom closed. I turned it back to right side out, inserted the pillow, and buttoned it back up. Piece of cake!!

Friday, June 7, 2013

I can fix that!

So, some time back I bought this shirt online and once it arrived it was too tight in the bodice so I gave it to my daughters. They decided that they like the shirt, but not the long sleeves.


Somewhere around the same time I also bought these pants on ebay. When they arrived I found that the flare in the legs was pretty major.....like I couldn't see my feet at all.


So, I was trying to decide how to take in the flare on the jeans because the seams on the inside of the leg and the outside are finished off and anything I did would be noticeable.

Then one day an idea struck me and I decided how to make things work out so that we would all be happy. I did the only logical thing. I cut the sleeves off on the shirt and the flares off on the pants. Woohoo!


I hemmed the sleeves on the shirt. Done! And the girls are happy with it.


I just have to add here that every time I use my sewing machine my husband gets a whole new set of brownie points for buying it for me!!

Just look at the beautiful job it did when I hemmed the sleeves on this sheer fabric!!


I took the lace that was in the middle of the sleeve and down at the cuff and separated it from the fabric. Then I stitched it together in one long strip.


I turned up the raw edge on the jeans (with right sides touching) and stitched the lace around the bottom and again around the top of the lace.


Ta-dah!! New capris.

And they're cute too!!


So now we're all happy.

I love it when I can take the things I am unhappy with and turn them into things that I AM happy with.

Tuesday, March 19, 2013

What a great pot holder!

Last month at sewing club during show and tell, one of the other ladies there had a pot holder that was pure genius. I heard her tell someone else that she used a pattern that she had bought somewhere else. So, the next day I got online and found it at Whistlepig Creek Productions. You can purchase either a print version to be mailed to you or you can download a pdf file.

Anyway, I think these are genius. And the reason is because these pot holders are made in bowl form to be used in the microwave. You put the bowl in the potholder, THEN you put it in the microwave. That way, when you take it out you don't have to life something hot to get it onto your hot pad. Genius, right?!

 I'm going to be making many of them.

This is my first attempt:


It didn't turn out quite as bowl shaped as I wanted it, but that is totally my fault. I cut the places where the darts go (which is what makes it curl up into the bowl shape) and then trimmed my pieces. After that I didn't go back and re-cut my darts so they're smaller than they're supposed to be.
 
Oh well, it still works. I've already used it several times. I'm going to make more as soon as I have some time to sit and sew for me. I'm pretty sure these will be gifts for quite a few people this year.

Monday, August 20, 2012

Getting ready for school

My kids start back to school next Monday.

I guess that means that I have to buckle down and make the things that they'll need for school. I've put it off just about as long as I can.

This morning I finished up Abigail's lunch bag.


I used the same materials that I used in this bag (a vinyl table cloth and an old sheet.) That bag was supposed to be a lunch bag but I missed one small detail in the directions (cutting my fabric piece in half) and wound up with a group sized lunch bag.

This one turned out much better!!

I didn't follow a pattern for this one. I cut the fabric to what I thought was about the size of the bag I wanted, making sure to make one side much longer than the other so that I could have a flap to fold over. I used a plate to round the edges of my flap, and put button holes in it so that my ties would fit through and tie it closed.

I think it turned out really cute and I just love that the pattern is silverware for a lunch bag. Abigail likes it too, and that's what matters most.

Thursday, July 19, 2012

Back to school

I'm trying to get some things done for back to school before the craziness starts.


I made this bag for Kirsten. It's not big enough to be a book bag, but all three girls like to have something to carry around school during the day. (They're not allowed to carry their backpacks from class to class.)

 The strap just ties at the top so that she can adjust the length to her liking.

And it's reversible!

The fabric in the first picture is some I bought a couple of years ago to make a bag to surprise her with. Since they come into my sewing room when I'm in there and snoop around, I hid it so that she wouldn't find it. 

I just found it again myself!! I tell you, when I hide something, it's for real! LOL

She's gone right now to her grandparents' house so she hasn't seen the bag yet. I hope she'll like it.

Wednesday, May 2, 2012

Lunch time

I found this really cute tablecloth on clearance at Target (my home away from home) and thought it would be great to make some cute little lunch bags with.

I had a free pattern for a lunch bag from All People Quilt. The construction looked easy enough so I decided to give it a try.

I made about three changes to the pattern as written.

For one, I added a handle/strap to it.

Now, mind you, I thought I was making a lunch sack. I figured one of my girls would probably use it and I wanted to make sure that their lunches (including their drink bottle) would fit so I opted for the instructions for the large bag.

When I was cutting out my material, I thought the 18 X 22 inch size seemed a little big but assured myself that with the sides and bottom of the bag it would work out to the perfect size.

That leads me to the second change I made. I changed it from a lunch bag to a picnic lunch bag because it's freakin' huge!!

But it's still pretty cute...


I used a piece from a pink gingham sheet for the lining and the handle.


Okay, I'm sure you're wondering what the third change I made is. I guess if you weren't already you are now, right?

Well, what the directions say is that you need an outside and a lining piece of fabric which are 18 X 22 each. Those are then to be cut into two 10 X 11 inch pieces for each fabric. DOH!  If I had really been paying attention to what I was doing my bag would have been exactly what I wanted it to be and not some lunch sack for a giant.

But, since I still have plenty left of both fabrics I guess that now I can make smaller lunch bags and have a complete set. LOL

Thursday, March 8, 2012

Bunnies......

I guess it's already time to start gearing up for Easter.


Actually, I probably should have done that long ago, but where's the fun in not rushing to finish something and set it out before the guests arrive? LOL


Over the weekend I made some of these bunny bowl fillers.


Aren't they adorable?

It's an awesome project for using up some of your bigger scrap pieces.

There's the pattern and a tutorial here. The pattern also comes with a little face that can be stitched and sewn to the front, but I liked them like this.

Mine are stuffed with little plastic pellets, but I think that rice or even stuffing would be fine. They're also called sachets on the pattern, but I didn't put any smell good in mine. Although, I am contemplating making one or two with catnip inside for my kitties.

I tried making some last year according to the pattern instructions because the seams should be on the inside, but every time I turned mine right sides out I ended up with a hole somewhere along the seam line on the ears. So this time around I left my raw seam edges on the outside, and I think they still look adorable.

Friday, September 23, 2011

Quick Refasion

When I was just looking through Craft Gossip (which I often do) I came across a great tutorial for turning a hoodie into a cardigan. Of course I clicked over to check it out.

The tutorial for it is at Coca Cola Island (you can go directly to it here) and it really is super easy.

I asked the girls for one of their hoodies that they didn't wear too much anymore and Abigail was the only one willing to take the chance.

I didn't think to take a before picture, but it was just a hoodie. :0)

I also didn't print out the tutorial and my computer at home is sick with a nasty virus so I can't use it. I had read through the tutorial and had to go by memory and I still managed to do alright.

 (I couln't get her to put down the popsicle or change out of her pajamas for the photo shoot. LOL)
She's pretty happy with it. At least that's what I'm assuming since she's already worn it to school. That makes me happy. And really, it doesn't take long at all. 

I think the only thing I really did differently than the tutorial said was that I didn't 'cut' the zipper out, I used my seam ripper and took it out to keep the nice edge that was already in place and to save the zipper. Win - win!

Wednesday, August 31, 2011

Mug set

I made the mug mat for this set quite some time ago. It's part of a craft pay-it-forward that I decided to participate in at the beginning of the year. But after I got the mat finished I didn't know what else to make to go with it.

Why it took me so long to think of making a cozy with more fabric from that collection, I may never know. I guess things just come to me sloooowwwwly sometimes. lol I mean, it's not like I haven't read a lot of blogs with lots of people making these. It just didn't click for me.

But once it did finally click, it only took about 30 minutes to knock this one out.

 I love this button. It's from a tin of really old buttons from an estate sale that a friend of mine bought for me.

I didn't have any coordinating elastic so I dug around a little. I had these little strips that I had cut from an old pair of my girls' tights (I use them to twist their hair up to curl it) and decided it would be perfect. It's got plenty of stretch but is nice and soft too.

Here's the mat, again.

 And the set together.

I'm putting it in the mail today. I hope she likes it!!

Monday, July 4, 2011

Happy 4th of July!!

I hope you have a wonder Fouth of July!


I just wanted to show another really quick thing that I made to help decorate for this holiday.


 It's all made with stuff I had on hand, which I always like. :0)

I used it to drape across this cake stand that I had some other decoration on. It sits in the middle of my dining table.

I thought it added a nice touch to the set up.

Friday, June 10, 2011

More Coasters

I made some more of those cute coasters that will hold fluted glasses too......but this time I made some for me. Woohoo! lol


For these I used Riley Blake fabrics (love her stuff!!!!) for the fronts and a pair of Dax's old blue jeans for the back. They turned out sooooo cute!!

To get all of those coasters I only used two charm packs and part of one leg of the jeans. And I'm in love with them.

But that probably means I won't let anyone actually use them. LOL

I had a helper when I was trying to take these pictures. Can you see her paw in this one where she was trying to grab the camera strap?


Here she is helping again.....

Tuesday, May 10, 2011

A New Bag........

My Mom has been saying for some time now that she needed to learn to crochet. Soooooo, for her birthday I had gotten her some supplies to get started.


I had looked at the bags at Hobby Lobby (it's all we have in my area) and didn't really find anything that I thought she would like.


Then last week, as I was grabbing some other supplies, I came across a display that had kits for aprons and a couple of different styles of bags. I decided to make one of those for her.


I chose this one because I thought she would like the fabric.


It comes as one big panel that includes all the pieces as well as the directions.


I thought that was great, especially for what I wanted to use it for.


However, the lining for this piece was a hot pink with black/grey leopard spots.  Not really my Mom's style.


So, I dug around a little in my stash and found this fabric instead.

It has the same colors as the outside fabric and the strap. Score!!


Anyway, I was careful when I stitched up the bottom of the lining by using an invisible stitch (although if you look closely, it's not invisible enough. LOL) Now, this bag is also reversible! Another score!!


I hope she likes it!


I saved the lining pieces that came on the panel and I'll use those to make another bag. Maybe a school bag for one of the girls for next year?

Tuesday, March 29, 2011

Craft Pay it Forward

This year I'm participating in a craft pay-it-forward.

I've completed my first project and it's ready to send out, if I'll just get that done. lol

Anyway, this is going out to a friend that I worked with years (and years) ago.

It's a mug mat and I got the patttern from As Sweet as Cinnamon. She did her's in colors and, as you can see, I did mine in redwork.


Please ignore my Christmas mug. I'm still using them because I like the way they're shaped. LOL

Tuesday, February 15, 2011

Valentine Sewing

I did actually get something completed over the weekend. I was glad that it was actually warm enough to get back out to my little space and get some sewing done.

This is from a cute little mini quilt kit that I ordered from Daisy Cottage Quilting.


I just love Sharon's stuff. We seem to have just about the same taste so I need for her to quit getting new things in because I can't keep up. LOL

Oh, and I appologize for the pictures. I finished sewing the binding on while I was waiting for Addison at soccer practice and I was taking the pictures out in the parking lot at the park. I'm sure the other people around wondered what the heck I was up to! Crazy lady alert!! LOL

I have to say though, that when I finished the top I showed to my husband and he couldn't see the heart shapes made by the squares. I had to actually fold it up so that only one little red heart was showing before he got it. Then, I showed it to all the girls and asked them what it was. They all immediately said 'Hearts.' Then, I showed it to my son and he said they were red 'V's'. So, I guess the males in my house have no imagination or something? Or maybe they just need things spelled out for them a little more clearly? I dunno'.

Wednesday, January 19, 2011

Binder cover

Last night Kirsten called me to let me know that she needed a new binder for Health class. Naturally, I was almost home when she called (we don't live in town.)


As I was driving I was trying to figure out how to make things work without having to turn around and go back into town and I remembered that Addison had thrown a binder away the night before.


I told Kirsten to go dig in the trash and see if she could find it. She did and she did. She was complaining that it was all torn up and she couldn't use it (duh, that's why Addison had thrown it away.) Anyway, I told her that when I got home I would just make a cover for it and then she would still be able to use it.


So, I went out to my 'studio' and dug out some fabrics and got to work. I had no pattern to go by, just a general idea of what I was trying to accomplish.


Here's what we wound up with:


I knew right away that I wanted to use the green fabric with the vegetables on it since it was for Health class. Kirsten thought that was a cool idea too. I didn't have enough of the green fabric so I had to do the insides in something else. Addison was 'helping' me and chose the blue fabric that I used. (She was really out there with me because since I was going to be doing something 'cool' to the binder she wanted it back. lol)


Anyway, the blue goes all the way down on the inside of the binder and the green on the inside is pockets. I also glued some batting to the outside of the binder to make the look a little smoother since it was in pretty rough shape.


I'm still trying to decide what to do on the front of it to decorate it up a little. I'm thinking maybe just 2 or 3 yo-yo flowers or something like that. Just a little something extra, you know?


Anyway, the only thing I would have liked to have done differently is on the inside. I wish that I had had enough material to come all the way over to the rings. I'm still trying to think of something to do to get that part covered up. Kirsten is happy with it just like it is, but I just can't let go. It's just not done enough. lol


Of course, the other two girls have been trying to decide what fabrics they want me to use to make binder covers for them. They've already been talking about how they'll be the only kids in school with such awesome binders. lol Addison is already trying to decide how much her friends should have to pay if they want me to make one for them too. They are certainly my biggest fans. Gotta' love it!!!

Wednesday, January 12, 2011

Quick and fun scarf

I was puttering around online the other day (I know, what a stretch!) and I saw a picture of a scarf that had an animal at each end. It was really cute.


I don't have any idea about how that scarf was made, but I did one of my own.


First I asked Addison if she had any stuffed animals that she didn't want anymore that also had black in it. I asked for black because I knew I had some black fleece on hand.


She came back with a panda.


So, I cut it in half, took out a little bit of the stuffing, and stitched a half to each end of my fleece.


Lickity-split, in a matter of 5-10 minutes, she had a new scarf.


Forgive the model. I can almost never get her to act normal in a picture.


Although, really, for her this level of silly is normal.