Sunday, December 14, 2014

Stitching while away

My husband and I were recently gone for many days getting a big chunk of continuing education out of the way. Because of this we were in Las Vegas for 10 days. Let me tell you, that's a long time to be there. It's so overwhelming to the senses, and after so many hours during the day learning changes in accounting and tax reporting (it's not really as sexy as it sounds) we have the need to get out at night. So, as you can imagine, we're exhausted by the time we get home.

Anyway, while we're there, a couple of the days I don't have any classes so I took some stitching with me to work on.


It's one of those packages of pillow cases that already has the pattern printed on it. I decided to do it in all red to go with my bedding. I'm actually making these just for me.

I got the cases on Listia.com. If you've never been there you should check it out. It's great for getting things and for getting rid of things you may no longer need.

I did mange to finish one of the cases and I'm about a third of the way done on the other. It feels a little like an accomplishment, but won't really until I can see them on my bed.

Here's the one completed.


I think I'm going to like them.

Wednesday, November 26, 2014

Squared away

I know it's been forever, but this time it's actually not my fault. lol My computer contracted a couple of really nasty viruses. There were two different ones that are new that each did a lot of damage in completely different ways. We tried for a couple of days to make repairs to no avail. Then we took it to the computer doctor and after he spent a week trying to save it, we had to concede defeat and wipe the hard drive clean and start from square one. Not only did we have to reload all of the programs for work, we had to go back and retrieve (thank goodness we had carbonite) all of the files and pictures that were specific to my computer. At this point we've spent roughly three weeks trying to get things back to regular working order again, and I'm still finding little things here and there that we missed. It's just crazy.

In the meantime, I've managed to get all the pieces made for a sweater. Now it's time to join them all and see what I have. Wish me luck!


Sunday, November 9, 2014

Another Halloween Finish

I know it's far after Halloween and I should have posted this ages ago. But, I've been having a heck of a time. My regular computer has a virus.....actually, the computer repairman told me that there were several and that they were deep. There's a good chance that I've lost years worth of pictures because our back up system may have overwritten those files with the corrupted ones. I won't really know until I get it back. Gaahhh!

So, here I am, trying to catch up.

One of my daughters worked with me to get this wreath made. She glued the googly eyes onto the ping pong balls. I found an old hanger and shaped it into a circle and then just gathered a spool of tulle onto it. Then Kirsten, my daughter, glued the eyes onto the wreath.


We thought it turned out pretty cute. Er, I mean scary.....it's very scary.


It was hard to really get the full effect of the eyeballs for the picture, they kept looking away.

Anyway, it was a great project to do with my daughter and would be a good project for most kids. She's almost 16 so it was fine for her to use the hot glue gun, but you could use regular glue for younger kids, or maybe even peel and stick googly eyes so that they can help too.

Wednesday, October 29, 2014

A Halloween Finish

I did this stitchery some time ago and then never did anything with it.

I recently came across it and actually had some Halloween fabric to use with it.

So, Hooray!! I got something completed. lol


I used the backing fabric to wrap around and make the binding on the front. I'm not sure if I'll leave it like it is or if I'll add some buttons in the corners or something like that to jazz it up.

If you'd like to stitch one for yourself, you can find the free pattern at Feeling Stitchy. I used crayons to color in my stitching and then ironed (with a cloth covering the colored portions) to set the color.

It's a great way to add even more depth to your stitching.

Monday, October 27, 2014

Boot Cuffs

I made these cuffs for my daughter, Kirsten, last year for Christmas. 


Or maybe I should say that I crocheted them, but didn't get the buttons sewn on until just recently.


How sad is that? The problem was that I couldn't find any buttons that I really liked. Frankly, I'm not crazy about these, but I figured I really should finish them so that she could have them.


It was a really quick and easy pattern, but I've since lost it. I've looked everywhere and just can't seem to find it - online or in print. If I come across it, I'll be sure to come back and post it here.

Tuesday, September 30, 2014

Spoiled Rotten

This is how he's learned to get his way.....


How could I possibly say no to that face?

Monday, September 22, 2014

Drink Cup Cozy

I can't believe how much time has gone by between my posts! It's been that way all year too. I don't even know why. I guess that I just get too busy. The kids all have their things going on which keeps me crazy busy too. It seems that by the time I get a few extra minutes when I could be updating my blog, I'm just too tired to do anything more. lol

But, I have actually been getting things done.

For example,

I used some of my scraps to make a cup cozy.

I decided on fabrics in red since it's my favorite color.


I just cut strips of different sizes depending on what I had to work with. Then I just stitched them together in straight lines.


You can see that one of my pieces ended up being a little shorter than the others. I hate it when it becomes obvious that I wasn't paying as close attention as I should have been.

I used one of the paper holders that I got from a local coffee shop as my guide. But, does the coffee in the cup that it came around counts as a 'research' expense or 'supplies'?

Anyway, I traced that on the back side of my piece.


Then, I cut it out about 1/4 inch bigger than the lines I had drawn.


After I had that piece, I cut out a piece of batting, and a piece from a coordinating fabric. I like the whole optical illusion that it creates to lay these pieces out like this. They're all the same size, but it certainly doesn't look like it.


 Then I layered them like you see here. My single piece with the right side facing me, my stripped piece face down on the single piece, and then my batting on top of that.

I stitched a quarter of an inch from the edges and then trimmed things as close as I could, leaving an opening on one end. That opening allowed me to turn my piece right side out and left a place for me to sew my elastic loop to.


Here's the turned piece...


I put a little loop of elastic in the opening on the one end, folded my pieces to the inside, and then top stitched around the entire piece.


I put two heart-shaped buttons on the end opposite from my elastic loop. I decide to use two buttons so that I could adjust the fit if I needed to.


Ta-Dah! It's all done!!


I really like the way it turned out. I like things that feel homey and this does to me.

Now if only I could remember to take it with me when my husband and I go to that coffee shop on our Sunday morning dates.

Wednesday, August 20, 2014

A quick little bracelet

I have a new obsession.

It's a website called Listia and I'm hooked. It's like an online garage sale auction. You earn credits by selling your own stuff (for credits) or doing some of the activities they have available. No money exchanges hands unless you charge for shipping or win an auction that charges shipping.

Anyway, I have bought all kinds of stuff on there and it's so much fun because I'm not breaking the bank doing it. :0)

Recently I won these little bead doo-hickies that someone had left over from their own project.

 
 They were hand twisted on the wire and there were just the five of them. I had no idea what I was going to do with them, but I liked them.

Well, when they arrived and I could see the actual size of them all live and in person I knew exactly what I would do.

I grabbed a few jump rings and a clasp.

Then, a few curse words later, wallah....

I had a new bracelet!!


I'm thrilled with the outcome (and the price). Especially since (little known fact here) I'm a bracelet junkie!!

OK, it might be a pretty obvious fact since I almost never leave home without at least one bracelet on. I know people that won't leave home without lipstick, my Mom won't leave without earrings, and for me it's bracelets....and earrings....and make up..... lol

If you haven't been to Listia yet, go check it out. I usually narrow my search to just look at the craft stuff, but there are all kinds of things to score. However, if you get hooked I hold no responsibility.....you've been warned.

Friday, July 11, 2014

Peach overload

A friend has several peach trees in his yard and this year they are performing better than usual. He asked if we would like some peaches, and of course we said yes. Then he showed up with this.

 
That's not including the ones that I had to throw away because they had gotten too bruised.
 
The first task at hand was to skin them all. They weren't quite ripe yet so I had to let them sit for a couple more days. Then I put them in slightly boiling water for about 20-30 seconds. Next you remove them into a bath of ice water for another 20-30 seconds. I moved them from there to another bowl to wait for me to remove the skins. If your peaches are ripe the skins will just peel off, if not, they will still stick to the peach. Also, I worked this in an assembly line fashion because the pot I was using would only hold 6-8 peaches at a time (depending on their size.)
 
After they were all cut up, I took the bad ones that I had pulled out earlier, all of the skins, the pits, and some potting soil and dumped it in a corner by our pasture. I'm hoping that next spring I will be able to see some peach tree sprouts. Keep your fingers crossed for me!!
 
I cut up and froze three quart sized bags of them.


 I made a peach cobbler.

It was really good. I used this recipe from Center Cut Cook. It was really quick and easy to put together.

I also cut up a bunch to can, but never got around to that. Just ate them as they were.

We are loving Summer's bounty and the generosity of friends.

Wednesday, July 2, 2014

Upcycled overalls

I started these forever ago. I put them away (probably because people were coming to my house) and then promptly forgot about them. I recently came across them again and finished them.

I just love them!!


Here's a close up of the face I put on the bib part:
 

I used a page from a children's coloring book as the basis for my pattern. I think that's a great place to find things to pattern off of.....especially the ones for younger children because they're big and simple.

I can't believe I forgot about having these because I was almost finished with them when I had to put them away. It probably took me all of 10-15 minutes to get them done. Sheesh!!

Thursday, June 26, 2014

DIY Face Powder

I've seen that you can make your own face powder all over the net. I've looked at a ton of different sites and found instructions from easy to complicated.

Well, since I'm all about the easy, I decided to try the most basic of powders......two ingredients.


Yep! That's it.

I started with about 2 Tablespoons (heaping) of corn starch and added the cocoa powder in 1/2 teaspoon at a time. I think this is about 1 1/2 teaspoons.


I tried it as a powder foundation, but I prefer a little more coverage. But, I love it as a loose powder over my regular foundation. The corn starch really helps with taming the shine from my summer oily skin.


The actual recipe that I found used arrow root powder, but I had corn starch on hand so that's what I used. So far it has worked for me just fine. I also saw recipes that included nutmeg or cinnamon to adjust the color. I tried with a little nutmeg, but found it to be too grainy. I didn't try the cinnamon because I was happy with what I've got. One word of caution though, always be careful when using cinnamon to be applied to the skin. It can irritate the skin very quickly. It won't take much. That's why I didn't even bother. It wasn't worth risking it. I've made other beauty products (like scrubs) that I use cinnamon in, but not for my face.

So, if you want to try something else to make for yourself (and costs about 25 cents) give this a go. I'm loving it so far!

Tuesday, June 24, 2014

Sneak Peak

Here's a sneak peak of a work in progress.

It's a cross stitch of a pumpkin with a Celtic design.


I usually follow the rules and stitch all of one color (at least in one general area) at a time. But this time I decided to be a rebel and do both colors as I go!

What?!

I KNOW!

I'm sometimes wild and crazy like that.

I decided to do it that way because I'm only working with two colors so it's not all crazy and confusing. I have two needles threaded. I work down my line and back with the one color, and then do the same with the second color. So now as I finish each line, I'm really finished with it. It's giving me a better since of accomplishment as I go along.


Now, this is working for me on this project, but I certainly wouldn't try to keep up with all of my needles threaded if I had any more than just two colors.

I'm hoping to have this finished before the Fall, but I'm really not holding my breath. I haven't done any cross stitch in a long time and I really forgot just how slow it goes.

Tuesday, June 10, 2014

Even a little bit helps.

In this case I'm talking about a little bit of organization. I can freely admit that it's not one of my strong points, but I do try to make baby steps in that direction as often as I can. I have learned to not kid myself into taking on these huge makeover into being organized kind of projects. If I don't do it in small doses, I don't usually follow through. So, I've seen all the space saving techniques for plastic grocery bags and decided to give it a shot.

With shopping for a family of six, I end up with a lot of those bags around my house. (And, yes, I use them for all kinds of other things around the house, but still have them everywhere.) I do own several of the reusable grocery bags which I actually keep in the back of my car so I'll have them with me. If only I could remember to carry them into the store with me, I'd be set!

Anyway, the tutorial I used can be found here.

This is what I started with:


That's three bags filled to overflowing!!!

As you can see, I forget to take the extra bags to the recycle bin even more often than I forget to use the other bags.

But, after spending quite a bit of time folding these bags, they all fit into the one lunch tote size bag......with room left over! Woohoo!! A little bit of organizing that I can keep up with and it really does make a big difference.


Here's another option for 'folding' them. I tried it, but I found that the football fold made the bags smaller and flatter.....although that can just be me. lol

Hope this helps with extra plastic bags around your house and that even a small bit of organization like this makes you as happy as it has me.

Thursday, May 29, 2014

It should have been quick

So I bought some large-hole beads and leather cording to make a quick bracelet.


Well, in theory it should have been a quick bracelet.


Instead I managed to mess up the cording where it attaches to the clasps for the bracelet. By the time I got everything worked back together, it felt like half the kitchen counter (where I was working) and half of myself were covered in E6000 adhesive.

But hey, it worked!

Here's the final product:


I haven't worn it yet.......waiting to be fully recovered from the trauma of the adhesive.......lol.......but I like how it looks. :0) That's gotta' count for something!

Tuesday, May 6, 2014

Reverse Applique Top

I got an order for a top with a reverse applique flower on it, and got it out last week. I hope she likes it!

 I love the colors she chose.


I've got the picture lightened up quite a bit, but it's a navy blue top with a bright green flower. The colors really pop together.

Thursday, May 1, 2014

Upcycled Bird Feeder

With all the eggs we used around here for Easter, I had plenty of empty egg cartons on hand. I wanted to do something with them instead of just throwing them away.

Here's what I came up with.....

I started with an empty egg carton and cut the lid off.

Then I cut it into a smaller size....


I poked holes in the mid-point on each side and ran some nylon cord through. I decided to use the mid-point because I ran the cord underneath all the way across. I hoped that would give it more stability.

Then I tied the cords together at the top, filled it with wild bird food, and hung it from a tree out front.

Pretty simple stuff. That makes it a great craft to do with young children.

 
I love it when I can use stuff I already have to make something new. And this time, the birds love it too.

Monday, April 21, 2014

Fun for Easter

I had an order for chocolate Easter Bunny brooches, which are hand stitched of brown felt. I think these are so fun and make a cute little Easter gift.


I hope they've made their new owners happy!!

Tuesday, April 15, 2014

Still here

I'm still here. It's amazing how sometimes life just gets so busy that it leaves so little time for other things. I've been squeezing in crafting when I can, but it's 'tax season' and that doesn't leave much time for anything but work.

For sometime now, I've been drooling over the dolls at Raggedy Old Annie's. She makes the cutest things. Well, she finally posted a picture of one I couldn't resist.

How cute is she?!

Go check out her stuff. She makes all kinds of themed Annies and they're all adorable.

Friday, March 21, 2014

One man's trash......

Once again time has gotten away from me and I haven't posted in ages. Life around here has been somewhat crazy recently and emotionally exhausting. I think things are on their way back to normal.....well, what's normal for us during tax season, anyway.

It's been a few weeks, but I made a new tote bag.


As you can see, I made it from an empty dog food bag. It's one of those nylon type bags so that makes it nice and sturdy and water resistant. I used a 40+ pound dog food bag so it's a large tote which is great. I'm hoping to use it to hold towels during a trip to the beach this summer. :0)
 
We have 5 dogs (3 of them are very large dogs) so we go through a bag like this about every 10 days. That's a lot of bags and I'm glad I found a way to use them again (and again.) But, since I can only use so many tote bags, I made a listing on etsy. But, now I have other ideas swirling in my head on other things to make. I just have to find the time to get them done.

Thursday, February 20, 2014

Shirt Upcycle

I saw a really cute shirt on Craft Gossip or so I thought. I went back to look for it so that I could include a link in this post but couldn't find it.

Anyway, here's what I did.

I had a Henley style shirt that I had never used, and I found a sequenced tank top that my daughter had outgrown.

 
I put on the Henley shirt and marked the spot on the back of the arms where my elbows hit. Then, I cut two hearts out of the red sequence fabric. I used a heart shape cookie cutter and some chalk to draw my heart on the shirt so that both of them would be the same.
 
Then I just hand stitched the hearts centered over the marks I had made. (I did match the sleeves together to make sure the hearts would be even on the shirt.)
 
And I wound up with this!


I love it!!

I'm sure I could have used my sewing machine to put the hearts on, but I really didn't want to fight with the sleeves while doing it so I just stitched them on by hand.

Hooray!! I just love being able to use the things that I already have on hand to make something that's fabulous and new!

Tuesday, February 18, 2014

Spoiling my pets

I thought I was just going to be spoiling the cats, but that's not how it turned out.

I made some felt catnip toys for them for Valentine's Day.

The first one I made was this red heart. I used scalloping shears to cut it out, stitched around the edges, and stuffed with some polyfil and fresh catnip. The cats loved it!

 
Then I stitched this one from some scrap felt that I had. It also has the polyfil and fresh catnip. And, once again, the cats loved it.


The problem is that the dogs loved them too! The dogs managed to get hold of both of them and got them all slobbery and wet before tearing them up. Who knew dogs love catnip too?!

Friday, February 14, 2014

A cute little bag

Wow! So much time goes by so quickly and I suddenly realize that I haven't posted here in ages. How does that even happen?

Awhile back I made a quick little bag. Turns out that 'little' is the key word here. The bag came out much to small for me to use for anything, so my daughter is using it as a makeup bag.

Anyway, you can find the 'instructions' here. I'm using the term instructions a little loosely because there are only pictures. It's all a guessing game.

I started with this pair of capris that I never wear. I figured that the side pockets would be great on the outside of the bag.

 
I did my best to figure it all out by following along with the pictures and this is what I ended up with.
 
 
 I with it had turned out bigger because I really like it, but it's working for her so I figure that makes it a success!!
 

Wednesday, January 8, 2014

Christmas Flashback


We were looking at old pictures and video over the Christmas season and happened across this video. We had forgotten about it, but it's one of our favorites.

These kids are so funny......then and now!

Tuesday, January 7, 2014

Machine embroidery.....first time

Well, I've had my sewing machine for a little over a year now. It's taken me up until recently to work up the nerve to try downloading different embroidery patterns and making them with my machine.

Okay, honest? I still wouldn't have worked up the nerve to do it even now if I hadn't been forced to.

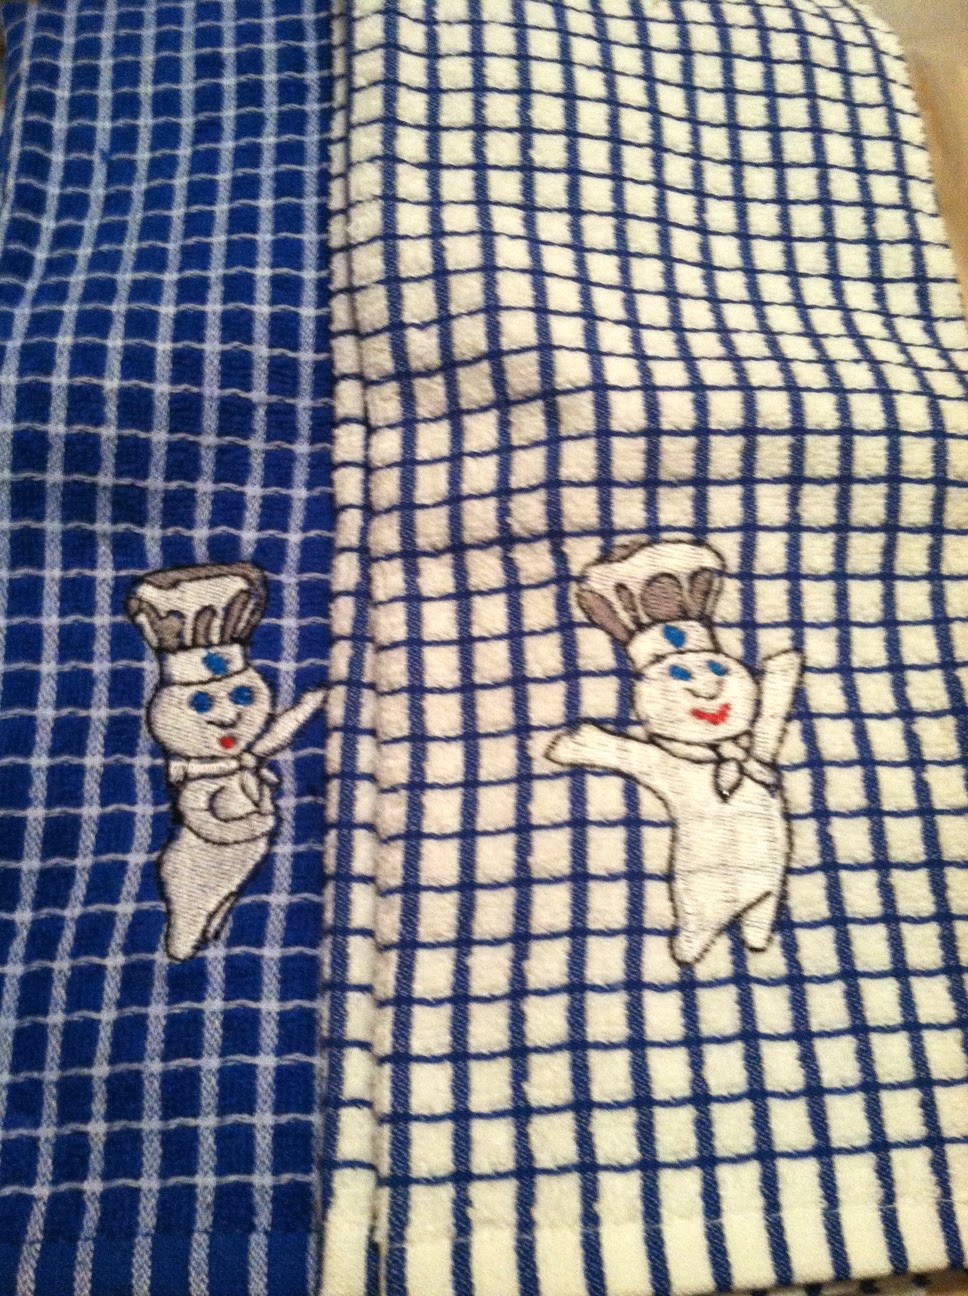
My mother-in-law loves the Pillsbury Dough Boy and has had her kitchen decorated with him for years. I've often bought her new towels and rags for her kitchen whenever I can find them with the Dough Boy on them or I've ordered many times from ebay.

Well, this year I found that even on ebay the prices have just gotten too high. I mean, really, $30 for a kitchen towel? That she's going to use daily!! I don't think so.

So, I found a site that sold sets of different dough boys and ordered them. At first my machine wouldn't read the file and in seeing my frustration my prince came to the rescue. He got online with Bernina and downloaded a program to transfer the digital file into one my machine could read. God I love that man!

And it worked!

I was nervous, too, about doing a pattern that required a change in threads because I didn't know anything about how to do it. But it turns out that it was much easier than I had anticipated.

I made these two towels with matching rags for her.


For the rags I scaled down the pattern to 50% of its original size.

I think they turned out great and she loved them so it was all good.

Who knows, maybe now I'll go crazy and embroider everything I can find. Ha!