Showing posts with label quick and easy. Show all posts

Thursday, March 30, 2017

Quick Easter Decoration


This was so quick, easy and inexpensive. I'm pretty sure that's the crafting trifecta!!


All I used as a tray from the dollar spot at Target, some cheap candles, and jelly beans from the dollar store.


I love it when a plan comes together.

Monday, June 22, 2015

Easter Pillow


I recently finished this cute little Easter pillow.


I got the kit from Sharon at Daisy Cottage Quilting. I don't know if she still has kits or the pattern available, but I know she has (maybe had by now) a finished one in her Etsy shop. She always has some of the cutest stuff. Go check it out.....and then drop by my shop and browse a little too.

Sunday, February 1, 2015

A quick Valentine


I've been busy today making these hearts.


How cute is that? It's a tiny little heart, only about an inch. And the best part is,.,,,it's so quick and easy!!

You can find the instructions here.

Now go make some!!

Monday, September 22, 2014

Drink Cup Cozy

I can't believe how much time has gone by between my posts! It's been that way all year too. I don't even know why. I guess that I just get too busy. The kids all have their things going on which keeps me crazy busy too. It seems that by the time I get a few extra minutes when I could be updating my blog, I'm just too tired to do anything more. lol

But, I have actually been getting things done.

For example,

I used some of my scraps to make a cup cozy.

I decided on fabrics in red since it's my favorite color.


I just cut strips of different sizes depending on what I had to work with. Then I just stitched them together in straight lines.


You can see that one of my pieces ended up being a little shorter than the others. I hate it when it becomes obvious that I wasn't paying as close attention as I should have been.

I used one of the paper holders that I got from a local coffee shop as my guide. But, does the coffee in the cup that it came around counts as a 'research' expense or 'supplies'?

Anyway, I traced that on the back side of my piece.


Then, I cut it out about 1/4 inch bigger than the lines I had drawn.


After I had that piece, I cut out a piece of batting, and a piece from a coordinating fabric. I like the whole optical illusion that it creates to lay these pieces out like this. They're all the same size, but it certainly doesn't look like it.


 Then I layered them like you see here. My single piece with the right side facing me, my stripped piece face down on the single piece, and then my batting on top of that.

I stitched a quarter of an inch from the edges and then trimmed things as close as I could, leaving an opening on one end. That opening allowed me to turn my piece right side out and left a place for me to sew my elastic loop to.


Here's the turned piece...


I put a little loop of elastic in the opening on the one end, folded my pieces to the inside, and then top stitched around the entire piece.


I put two heart-shaped buttons on the end opposite from my elastic loop. I decide to use two buttons so that I could adjust the fit if I needed to.


Ta-Dah! It's all done!!


I really like the way it turned out. I like things that feel homey and this does to me.

Now if only I could remember to take it with me when my husband and I go to that coffee shop on our Sunday morning dates.

Thursday, May 29, 2014

It should have been quick

So I bought some large-hole beads and leather cording to make a quick bracelet.


Well, in theory it should have been a quick bracelet.


Instead I managed to mess up the cording where it attaches to the clasps for the bracelet. By the time I got everything worked back together, it felt like half the kitchen counter (where I was working) and half of myself were covered in E6000 adhesive.

But hey, it worked!

Here's the final product:


I haven't worn it yet.......waiting to be fully recovered from the trauma of the adhesive.......lol.......but I like how it looks. :0) That's gotta' count for something!

Friday, March 21, 2014

One man's trash......

Once again time has gotten away from me and I haven't posted in ages. Life around here has been somewhat crazy recently and emotionally exhausting. I think things are on their way back to normal.....well, what's normal for us during tax season, anyway.

It's been a few weeks, but I made a new tote bag.


As you can see, I made it from an empty dog food bag. It's one of those nylon type bags so that makes it nice and sturdy and water resistant. I used a 40+ pound dog food bag so it's a large tote which is great. I'm hoping to use it to hold towels during a trip to the beach this summer. :0)
 
We have 5 dogs (3 of them are very large dogs) so we go through a bag like this about every 10 days. That's a lot of bags and I'm glad I found a way to use them again (and again.) But, since I can only use so many tote bags, I made a listing on etsy. But, now I have other ideas swirling in my head on other things to make. I just have to find the time to get them done.

Thursday, February 20, 2014

Shirt Upcycle

I saw a really cute shirt on Craft Gossip or so I thought. I went back to look for it so that I could include a link in this post but couldn't find it.

Anyway, here's what I did.

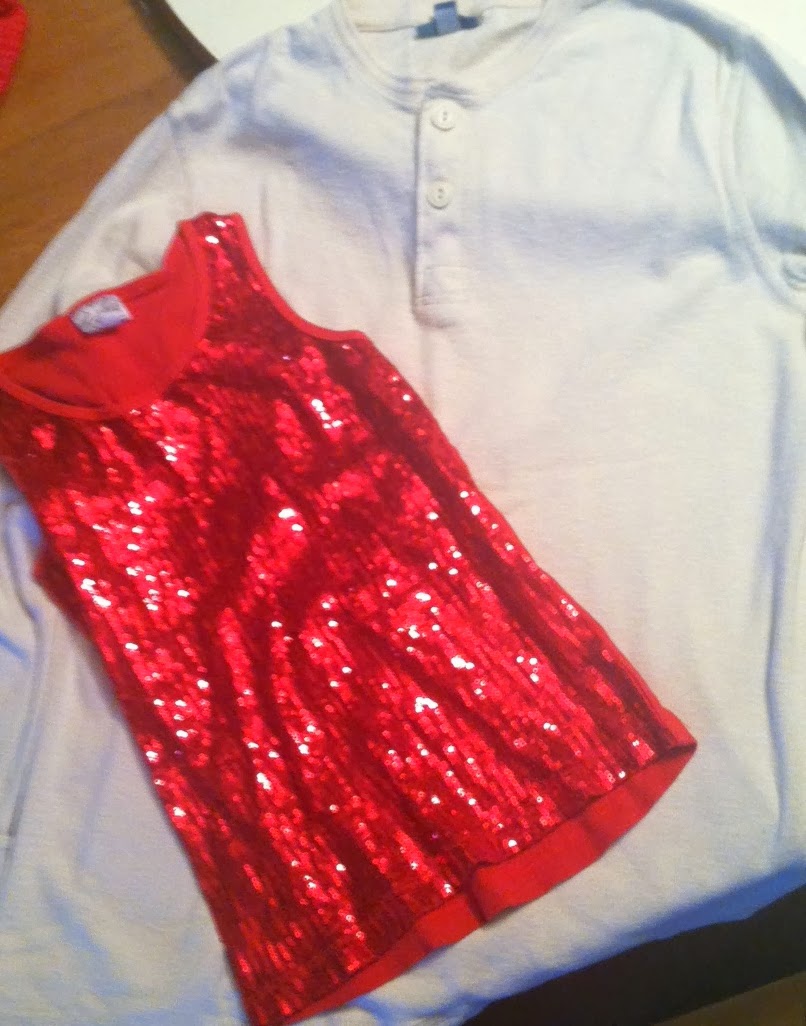
I had a Henley style shirt that I had never used, and I found a sequenced tank top that my daughter had outgrown.

 
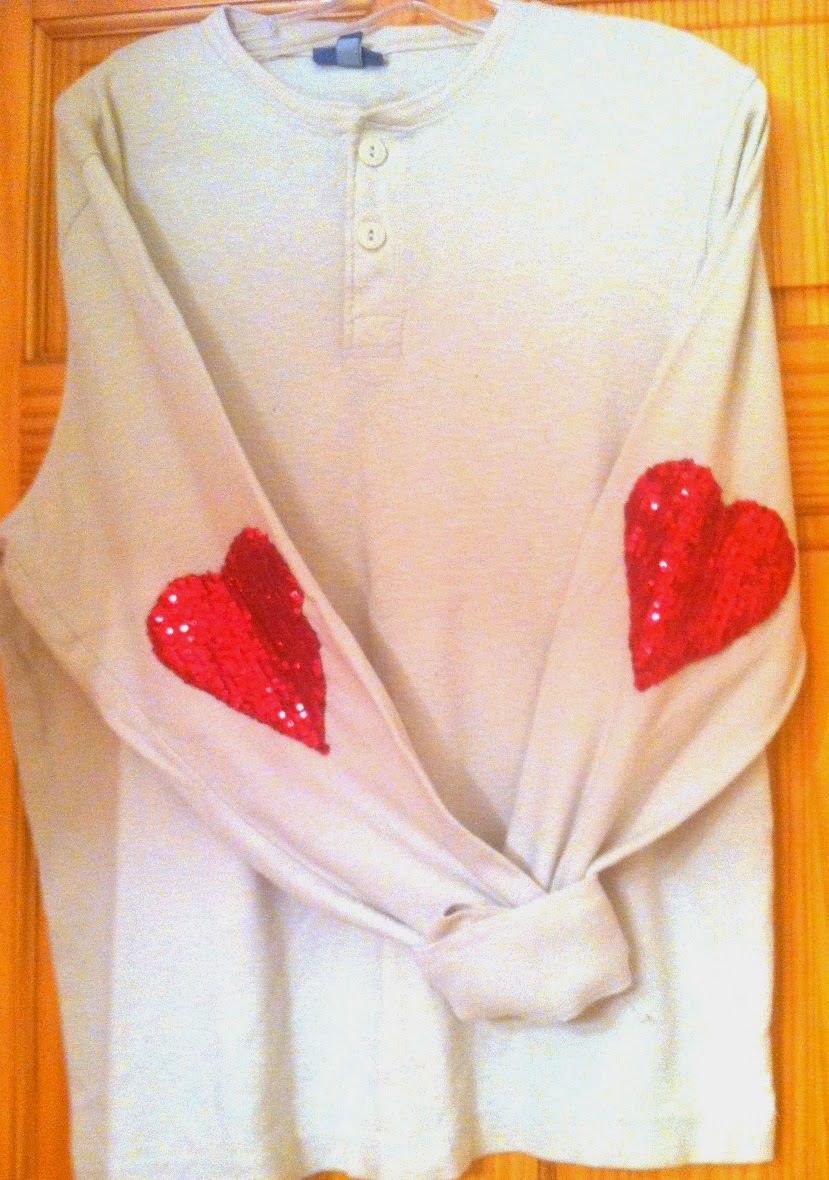
I put on the Henley shirt and marked the spot on the back of the arms where my elbows hit. Then, I cut two hearts out of the red sequence fabric. I used a heart shape cookie cutter and some chalk to draw my heart on the shirt so that both of them would be the same.
 
Then I just hand stitched the hearts centered over the marks I had made. (I did match the sleeves together to make sure the hearts would be even on the shirt.)
 
And I wound up with this!


I love it!!

I'm sure I could have used my sewing machine to put the hearts on, but I really didn't want to fight with the sleeves while doing it so I just stitched them on by hand.

Hooray!! I just love being able to use the things that I already have on hand to make something that's fabulous and new!

Friday, October 4, 2013

Halloween Quicky

This was so quick and easy for a cure Halloween decoration.


I just put a smaller jar inside of this large one to hold the flowers. Then you just layer your candies into the space between the two jars. Add flowers to the inner jar and you're done.

It's just that quick and that easy. And it's adorable to boot. What more can you ask for?

Tuesday, August 6, 2013

A Quicky

Finished a quick little project over the weekend.


I fed beads onto memory wire. It's curled in on itself at both ends. At one end I made a bigger loop so that I could add these cross charms.

That's it. Quick, easy, and cute. Now I like that!!

Wednesday, July 10, 2013

Ugly Christmas Sweater Gift

A few years ago I bout a Christmas sweater at Goodwill for the sole purpose of making a pillow with it. Well, since then my mother-in-law has been trying to sneak it out of the house and take it home with her. I've been looking like crazy to find another one but since people started having ugly Christmas sweater parties it's almost impossible to find one. But, that's because I was always looking when it was close to Christmas. I finally found one but it was in early June.

So, I took this sweater....


And made this pillow.....


She's going to be so happy when I give it to her.

It's really just a pillow cover because I left all of the buttons in tact and operational so she can just unbutton the sweater and take the pillow out if she needs to. It's also very quick and easy to make. I didn't have to take in the sides of the sweater at all so all I did was cut it off at the top, turn it inside out and stitch the top and bottom closed. I turned it back to right side out, inserted the pillow, and buttoned it back up. Piece of cake!!

Friday, July 5, 2013

Fourth of July Shirts

The girls made shirts for the Fourth of July. These were really easy to do, too.


We started with a plain white t-shirt and added a hand print in blue.


Next came some red stripes.


And that's it!! Then we just let them dry.


Easy stuff and it makes a really cute shirt.

Wednesday, July 3, 2013

I'm back......

Sorry for the long absence. We've been out of town on vacation for the last couple of weeks. We took a driving vacation from our home in Texas up to Pennsylvania and back. We did so many things along the way and had a great time.

It just so happened that Father's Day fell during our trip so the kids and I made Dax's present before we left and gave it to him on Father's Day.


The kids cut out the signs to hold up and I took the picture. I had the picture printed as an 8 X 10 and put it in a nice frame for him.

It was funny when we were trying to take the picture because I only had a few minutes in which to take it and it was cloudy, so we kept running around looking for the sunniest spots as the clouds moved.

I was happy with the picture and I think Dax liked it too.

I have more to show so I won't be absent as long this time. Hope you're having a great day.

Friday, June 7, 2013

I can fix that!

So, some time back I bought this shirt online and once it arrived it was too tight in the bodice so I gave it to my daughters. They decided that they like the shirt, but not the long sleeves.


Somewhere around the same time I also bought these pants on ebay. When they arrived I found that the flare in the legs was pretty major.....like I couldn't see my feet at all.


So, I was trying to decide how to take in the flare on the jeans because the seams on the inside of the leg and the outside are finished off and anything I did would be noticeable.

Then one day an idea struck me and I decided how to make things work out so that we would all be happy. I did the only logical thing. I cut the sleeves off on the shirt and the flares off on the pants. Woohoo!


I hemmed the sleeves on the shirt. Done! And the girls are happy with it.


I just have to add here that every time I use my sewing machine my husband gets a whole new set of brownie points for buying it for me!!

Just look at the beautiful job it did when I hemmed the sleeves on this sheer fabric!!


I took the lace that was in the middle of the sleeve and down at the cuff and separated it from the fabric. Then I stitched it together in one long strip.


I turned up the raw edge on the jeans (with right sides touching) and stitched the lace around the bottom and again around the top of the lace.


Ta-dah!! New capris.

And they're cute too!!


So now we're all happy.

I love it when I can take the things I am unhappy with and turn them into things that I AM happy with.

Tuesday, November 20, 2012

Quick and inexpensive gift idea

I saw this some time ago on pinterest but cannot for the life of me find it again to give due credit. I'm sorry to the brilliant person that originally thought of it.


Anyway!!


Dax's mom has been telling me over and over that she needs a new soap dispenser in her kitchen because her other one broke. I bought her the kind that she wants, but decided that before I give it to her, she gets this one first.


I took a picture of Dax and printed it out in color on plain white paper. Then I cut around it and took it to Office Depot and had it printed in color on transparency film.

I cut that out and rolled it up enough to fit inside this bottle of soap, which I peeled all of the labels off of. I really didn't care what scent it was, I just wanted the soap to be clear.

Here's a close up of the picture.


She'll get a big kick out of it.

And really, it only cost a couple of bucks to do. I think it would make a fun gift for anyone, even if the picture isn't this silly. It would be great for grandparents with pictures of the grand kids, or teachers, bachelorette parties,  or just about anybody and you can put any kind of picture in it. (Just remember that you might have to have someone else copy the picture when you take it in. HA!)

Friday, August 24, 2012

Jewelry

I found the cutest mustache charms on Top Hatter. Abigail is crazy about mustaches and I knew I had to make something for her with these.

I opted for a pair of earrings and a necklace.


I want to use some type of ribbon for the necklace but haven't decided what color yet. I was thinking black, but her favorite color is orange so that might be better.

I think she's going to love them.

Wednesday, July 25, 2012

Old to New

I've seen other examples of this several places on the internet.

I had a print that had been done on a really heavy paper.


I stretched the print over some canvas stretchers. Then I used some vinyl letters I got at Target (money saving tip: I got the letters in the teacher supply section - across the aisle from the craft section - for about half the price of the stick on letters in the craft section and I got about twice as many letters.) to  put my chosen saying on it.

After that you paint the whole thing (I chose white) and let it dry. Then remove your letters.

I ended up with this:


I think that at the very top I'm going to attach a family picture. I chose my saying because that's how Dax and I met. I asked him to dance.

I wonder how often he questions his sanity for saying yes to that dance. LOL

Tuesday, June 12, 2012

Baa baa little sheep

I've got more crochet stuff, but I didn't want you to think this had turned into a crochet blog. lol

I've had this fabric with hills and houses on it for some time now. I don't remember where it came from or why I bought it and I haven't known what I was going to do with it.

I saw a picture a few weeks ago with some sheep made from french knots and knew that's what I wanted to put on this fabric.


I think I'm going to make another, bigger one, and put a lot more sheep on it.

I thought it turned out cute and I still have a lot more of this fabric. And it's really quick too!

Thursday, May 24, 2012

It's a wrap....

It' been a couple of weeks since I made this swim suit cover, but couldn't get a decent picture. So I just gave up and went with what I had. I do apologize because we had already been down to the pool when I had Dax take these (and had a couple + drinks).


Anyway, this is super easy and only took a few minutes to make. I found the original by looking on Pinterest. (I know. I know. I may need an intervention.)

You can find the original post and tutorial on La Vie En Rose  here. She has several variations with tutorials.

Seriously, I don't think it could be easier.

Wednesday, March 14, 2012

Easter Chicks

I stitched up these adorable chicks in no time flat.

 Here are close-ups.


The kids are gone to their granparents' house for spring break so I had some uninterrupted time to work on these.

I got the pattern from Shiny Happy Word. It was a perk for being a member of her mailing list. I think that the little chicks are taken from her Chickens pattern on her website. She's got some really cute patterns on her site. Be sure and check it out.....and maybe get some Easter chicks made for yourself. :0) Maybe if you sign up for her newsletter too, you can get goodies like this in the future.

Tuesday, October 4, 2011

Good Food

It's been super busy around here which is predictable once school starts back up.

Addison is busy with soccer 3-4 days per week.

Addison and Abigail both have cheer leading at least 2 days per week.

We just signed Addison up with Kumon because she's needing some help in math and that's another 2 days per week.

If we throw in working, orthodontist appointments, and now doctors appointments since Wyatt dislocated his knee, that pushes us almost into overload.

However, I have been crafting in my spare moments as I find them. They mostly come while I'm in the car waiting for someone to their current activity. lol

The other morning I did make these s'mores crescents.

I saw a picture on pinterest and decided I could probably figure it out on my own.

(btw, is anyone else as addicted to pinterest as I am? It's an obsession, people!!)

I just took crescent rolls and places a few mini marshmallows and a few chocolate chips on top.


 I rolled them up (it helps to fold the sides in after the first roll--rumor has it that the gooey stuff can leak out and make a mess--not that I would know from experience) and cooked them just a minute or two longer than the directions on the package.


I guess they tasted alright since the kids ate them all and I didn't even get to try one. But I'll take those types of critiques any day.