Thursday, December 19, 2013

You can never have too many purses....

Or maybe I should say that I wouldn't ever admit to having too many purses.

And to go with that kind of thinking, I made this cute little bag for myself.


The pattern is really easy and it only took a couple of hours, start to finish, to get the purse made. I did make one change to the pattern though. I have a concealed carry license and often carry a firearm with me, so I really like to have a place to put it. Ha! Anyway, I added two large pockets to the inside of the purse. They start from a couple of inches below the top of the purse and extend all the way to the bottom. Because I put them in the middle, it actually separates the inside of the purse into two sections. It wasn't part of the original pattern, but it was a really easy little tweak.

I took the purse with me while we were in Las Vegas and actually had someone (a woman in an accounting class with me) ask me about it and express interest in maybe purchasing one. That's always the best compliment, isn't it?

I got the pattern from a link that my daughter sent me via Pinterest, but now I can't find it for the life of me. It's not in my Pinterest 'likes' or on any of my boards. I even did a search of where I thought it linked back to and still can't find it. How crazy is that?! I printed out the instructions, so I'll dig those up and post the link here as an update.

Monday, November 25, 2013

Make it a pocket tee.....

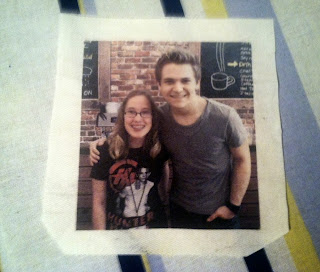
My children's birthday was last week. One of them is a huge Hunter Hayes fan and for her birthday she had asked for tickets to his concert in Dallas, so that's what she got.  Well, in keeping with that theme, I decided to make a customized shirt for her. I settled on a pocket tee with a custom pocket.

I chose a picture of her with Hunter Hayes from a concert that she had been to earlier in the year where she also purchased the 'coffee house experience' so that she could meet him.

I ironed freezer paper to a piece of off white fabric and then cut the fabric to match the size of the paper. (Be sure to iron it with the wax side to your fabric.) Then, I just ran that through our ink jet printer.


(I messed it up on the first go round--I put it in with a seamed side starting off which was too thick--so I got a little extra ink on the other end.)

After I printed my picture on there it occurred to me that I might should have done something special to the fabric. I got online and found some information saying that I should have treated the fabric with something before printing and then follow that up with a separate treatment after printing or the whole thing would wash off with water. I was in a panic!!! Then, I remembered that I had a Tide To Go pen in my desk drawer (I printed it at the office) so I tried that. First I tried to rub off the part where I had messed up and nothing happened. Then I tried a corner of the picture and, as you can see, it didn't even smear. What a relief!!

So I cut out my pocket leaving plenty of room around the edge of my picture.


Then, I hemmed it across the top of the pocket, folded the edges under, and attached it to the t-shirt.


So there you have it! It was quick and easy.

But best of all.........she loved it!!!

Friday, October 4, 2013

Halloween Quicky

This was so quick and easy for a cure Halloween decoration.


I just put a smaller jar inside of this large one to hold the flowers. Then you just layer your candies into the space between the two jars. Add flowers to the inner jar and you're done.

It's just that quick and that easy. And it's adorable to boot. What more can you ask for?

Tuesday, September 17, 2013

Made over Tee

I can't believe that once again it has been forever since I posted!! School for the kids has already been a little crazy. We're all still getting used to the fact that they are now in high school. Them because they have a whole new set of responsibilities and expectations. And me because, well....my babies are freaking in high school! How does that happen so fast?!

So far in the three weeks since school has started there have been three colds, two cases of chiggers,  and one sports injury. Hoping that the next three weeks are better!

Anyway, all of that to say that I'm staying busy, but having a hard time finding the time to blog. I have had a few orders to ship out so that's been a good thing.

I also made myself a new shirt. I started with a teal colored t-shirt. I cut out the neckline and cut the sleeves to be more flattering. Then I drew a flower near the neckline with chalk. I pinned a grey piece of jersey knit (I cut it off of a t-shirt that was destined for the rag pile) and stitched over my chalk lines by hand using a big straight stitch. Then I went back and cut away the top layer of fabric to form my petals.


I really like the way it turned out. I'll have to come up with some more designs and make others.

Friday, August 30, 2013

Back to school....

My children started school on Monday. So, on Sunday night I was busy getting lunch bags made because I had put it off all summer. I only made them for the girls. Wyatt wouldn't dare carry a lunch bag made by his mother. lol


In my haste I managed to get the handles twisted on two of them so I guess I'll have to go back and get those fixed. But, the girls are happy with them so I that makes me happy too.

I don't have a pattern for these, I just kind of wing it as I go. Maybe I'll put together a tutorial for it.....

Monday, August 19, 2013

Been Busy

Even though I haven't been posting much lately, I've still been busy. Had a few orders to get out and a few more still to get done.


I'm loving it, though!!

Tuesday, August 6, 2013

A Quicky

Finished a quick little project over the weekend.


I fed beads onto memory wire. It's curled in on itself at both ends. At one end I made a bigger loop so that I could add these cross charms.

That's it. Quick, easy, and cute. Now I like that!!