So, I found this cute little sweater and thought it would make a great pillow for Valentine's Day.
Showing posts with label recycle. Show all posts
Thursday, February 4, 2016
From sweater to pillow
Some time ago I watched a video where the speaker was talking about finding usable fabric in unusual places. Since I live in a small town and fabric stores are few, I took this to heart. When I'm out at the thrift stores, I look at things a little differently now.
Labels:
hearts,
old to new,
pillow,
quick sewing,
recycle,
upcycle,
valentine
Saturday, February 28, 2015
Upcycled pin cushion
How cute is this tiny little pin cushion?
It's only about 2 inches tall by 3 inches wide.
I used a little cup that I filled with ground walnut shells (to help sharpen pins) and glued a little puff filled with fiber fill. I lined under the fabric with a piece of felt to help hold the pins in place.
I just can't get over how cute it turned out! I've got several more little containers to work with and can't wait to see how they turn out.
Labels:
pin cushion,
recycle,
sewing,
supplies,
upcycle
Friday, February 20, 2015
Thursday, January 1, 2015
Recycling I like
I know that most often when people talk of recycling, it's just aloud putting your stuff into the correct bin and assuming that it's being taken off to be torn down and the reused. I prefer taking something I have and making it into something new myself. That way I know what happened to it.
I am pretty happy with the outcome. That's the way I like to recycle. It's much prettier than it started out being.
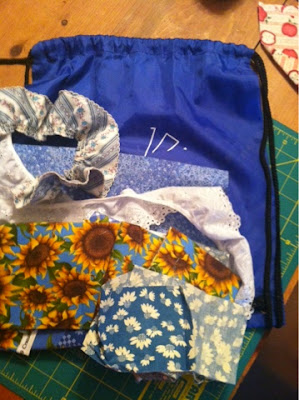
One of my kids had received a nylon backpack at a music festival that she participated in. It's not the kind if thing that she was going to use. So, after it sat around here for eons, I finally decided to so something with it.
I gathered up material in coordinating blues.....

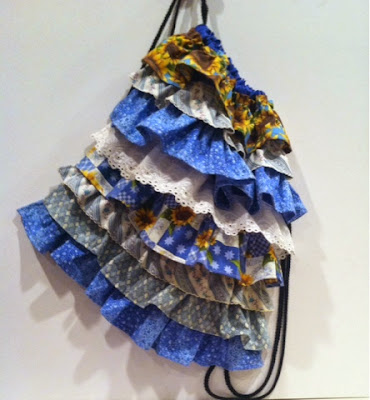
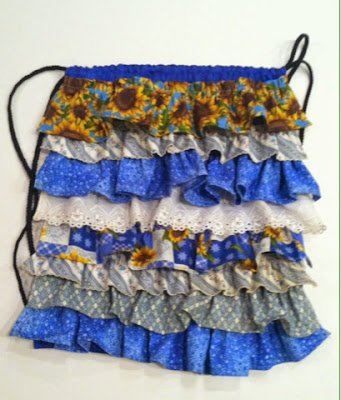
Cut my fabrics into a bunch of strips which which I then gathered and sewed onto my backpack in layers. To make this easy, I advise that you start at the bottom and work your way to the top.
Here's the finished product...


I am pretty happy with the outcome. That's the way I like to recycle. It's much prettier than it started out being.
Thursday, May 1, 2014
Upcycled Bird Feeder
With all the eggs we used around here for Easter, I had plenty of empty egg cartons on hand. I wanted to do something with them instead of just throwing them away.
Here's what I came up with.....
I started with an empty egg carton and cut the lid off.
Then I cut it into a smaller size....
I poked holes in the mid-point on each side and ran some nylon cord through. I decided to use the mid-point because I ran the cord underneath all the way across. I hoped that would give it more stability.
Then I tied the cords together at the top, filled it with wild bird food, and hung it from a tree out front.
Pretty simple stuff. That makes it a great craft to do with young children.
I love it when I can use stuff I already have to make something new. And this time, the birds love it too.
Here's what I came up with.....
I started with an empty egg carton and cut the lid off.
Then I cut it into a smaller size....
I poked holes in the mid-point on each side and ran some nylon cord through. I decided to use the mid-point because I ran the cord underneath all the way across. I hoped that would give it more stability.
Then I tied the cords together at the top, filled it with wild bird food, and hung it from a tree out front.
Pretty simple stuff. That makes it a great craft to do with young children.
Labels:
bird feeder,
crafts for kids,
recycle,
simple crafts,
upcycle
Friday, March 21, 2014
One man's trash......
Once again time has gotten away from me and I haven't posted in ages. Life around here has been somewhat crazy recently and emotionally exhausting. I think things are on their way back to normal.....well, what's normal for us during tax season, anyway.
It's been a few weeks, but I made a new tote bag.
As you can see, I made it from an empty dog food bag. It's one of those nylon type bags so that makes it nice and sturdy and water resistant. I used a 40+ pound dog food bag so it's a large tote which is great. I'm hoping to use it to hold towels during a trip to the beach this summer. :0)
We have 5 dogs (3 of them are very large dogs) so we go through a bag like this about every 10 days. That's a lot of bags and I'm glad I found a way to use them again (and again.) But, since I can only use so many tote bags, I made a listing on etsy. But, now I have other ideas swirling in my head on other things to make. I just have to find the time to get them done.
Labels:
quick and easy,
quick sewing,
recycle,
totes,
upcycle
Monday, June 3, 2013
A New Look
Every year my parents give us one of those big tins of popcorn. And every year the kids devour it and I throw the tin away. Well, this year I decided to try to make something useful from it.
It started like this:
I roughed it up with some steel wool. (Not the mafia kind of roughed up, just a little scratching the finish. HA!)
Then I coated it with a thin layer of mod podge and applied a couple of sheets of scrap booking paper. Of course it needed two sheets plus about 1-1/2 inch of a third sheet of paper. One of my daughters was quick to point out that I didn't match the seams.
I sent her to her room.
Not really, but I did tell her not to inspect my work so closely.
Here's the finished product. Well, maybe finished. I have paper to do the lid but haven't done it yet. I can't decide if I should or not. I mean, the red actually matches.
So, I did this with no idea of what I was going to use it for. But this morning I think I actually decided to use it to hold the wild bird food. Right now it's just in the bag sitting on my pantry floor and won't this look so much better than that?
If I keep making things that are cute to hold the stuff in my pantry I'm going to have to take the door off and force people to go look at it when they come to my house.
Monday, October 1, 2012
New bracelet from trash
The girls and I had some fun playing with some of the trash from the office. We have a candy dish at the office and I keep the good stuff in there--the fun size candy bars. I saved up several of the wrappers that didn't get all torn to pieces when they were opened.
I put them on parchment paper in the oven at 300F for just a few seconds (probably about 30-45) and shrunk them down.
Keep a close eye on them because once they start to shrink, it happens fast.
After it shrunk down (it was less than half it's starting size) and cooled, I punched holes with a small hole punch and put a black chain on it.
The daughter wearing it thinks it's the coolest thing ever....and I'm good with that.
I left some in too long and they got really small. I liked that but the stuck to the paper in weird spots and couldn't be read any longer, so I may try again and see if I can get them small enough to make charms.
Who knew trash could be so much fun? Besides, if clients don't come in and eat the candy, I'll just have to do it.....in the name of art, of course.
Tuesday, September 25, 2012
Totally unnecessary changes
I don't know if you're like me in this, but I just can't stand reusing the tubs for margarine, sour cream, etc. And it's not that I have anything against them, I just don't want to open five containers to find the one that really has the sour cream in it.
Well, there is an answer to the problem!! It is totally unnecessary but if you prefer to recycle AND save money it's a wonderful solution.
The printing on these containers can be removed.
For real!!
Here are my supplies.....
A bottle of acetone (nail polish remover), a bowl (I used glass), a clean white rag, and the container you want to de-print.
Soak the rag with the acetone and wrap it around your plastic tub making sure the rag touches it all the way around. Then put it in the glass bowl. I put mine into the glass bowl upside down and then poured a little more acetone on it just to make sure there was enough.
Then, I wrapped it all in a plastic grocery bag to contain the smell and to keep it from drying out while it sets.
I let it sit like this for about 15-20 minutes.
Note: If you use a grocery bag like this, be careful not to get the acetone on the bag. It will remove the print from it too. Maybe onto your counter. Not that I would know from experience or anything.....it's just a theory.
Once it's set for awhile, unwrap it and use the acetone soaked rag to wipe the tub clean.
I've been doing it to all kinds of containers: whipped topping, grated cheese, yogurt, etc. I might not have to buy plastic storage containers again. woohooo!!
Tuesday, November 15, 2011
Recycled crayons
Well, first things first.
Since I only had one entry for the My Memory Suites give away, Libbie is our winner. Congratulations!! You're going to have a lot of fun with this software. It's addicting.
I had seen a picture of this, but didn't have any of the instructions to go with it, so I was just winging it.
I dug out our tub of old crayons, markers, colored pencils, etc. The girls and I pulled out most of the old and broken crayons, peeled the paper off, and broke them into small pieces.
I had bought two different silicone molds at Target in the dollar section (although they were more than a dollar lol) to use. One was a gingerbread man and the other a Christmas tree.
I decided that I wanted my recycled crayons to be thick so that they wouldn't break easily with little hands trying to color with them. So we filled the molds to the top.
We had to refill that little yellow bowl several times to get all the molds full.
I put them in a preheated oven at 225F. I really don't know how long they were in there because I got started cleaning the dinner dishes and forgot about them. lol I remembered when we were able to smell the wax.
This is how they looked when they came out.
The wax mixed together a little more when I was taking them out just from the movement.
And here's the final products.
I'm happy with the way they turned out. I had to make a second batch because my girls took off with most of the first one. I'm going to send one of each shape along with a Christmas coloring book to my nieces and nephew.
Some things I learned.....
The cheap crayons are easier to peel.
But, some of the cheap crayons won't melt well. There were a few green crayons that didn't melt no matter how long I left them in there.
A shorter melting time would probably keep the colors from mixing together quite so much.
The smaller the crayon gets, the harder it is to break.
It was a fun project for the kids and I to do together and now I've used up almost all of the old, yucky, broken crayons.
Saturday, July 2, 2011
Recycling or Upcycling
Either way, it's making someing great out of something ordinary. :0)
I got this really great bracelet from Whoop D Whoop (if you haven't been there you really should go) from sodacangirl.
It's a bracelt and the 'charms' are made from a Pepsi can. I also got one from her that was made using a Arizona Tea can, but I gave it to my Mom.
Anyway, how great of an idea and how fantastic of a bracelet does that make? I love the bracelet and spent some time looking at it trying to decide how she made it. I finally decided to hit the scrapbooking department at the store and buy a punch and try to make my own.
I decided on a flower shape. I had a diet root beer can at home so decided to try the punch on it. It worked out perfectly!! I used a hammer and small nail to put the holes in mine for the jump rings, but next time I'll just use a tiny little hole punch (especially since I found mine the other day while looking for something else. lol)
Here's my finished product:
(I wish the pictures were better, but I took them at night.)
One of my daughters has already claimed this one. My kitchen counter is lined with different cans that they want made into bracelets. I love the fact that they are now looking at the colors and patterns on soda cans to decide if they wan a bracelet out of them. I like it anytime I can get them to see something a little different that its usual use.
I have to say though, that it took me a LONG time to get those charms onto that bracelet. I spent almost a whole week doing it because I was getting sooooooooo frustrated that I would have to put it down and walk away. Then, on the last two charms an easier way to do it occured to me. Typical!
Monday, April 25, 2011
Easter Bunny
My daughter, Addison, has been asking the Easter Bunny for a 7-foot bunny for years now.
Because I am one of 'those' kind of parents, this year she finally got what she has been asking for.
Well..............kinda'...............
View from the back....
I don't think she was thrilled with the Easter Bunny. LOL
To make this, I just bought four bunnies at the dollar store and used the legs off the other three to sew onto this bunny.
My father-in-law kept giving me a hard time about the other bunnies being out there dragging themselves around with no legs. That's just uncalled for. LOL
Addison acted all put-out about it yesterday, but I saw her grab it to take to school with her today to show her friends. I'm taking that as proof that she thinks it's funny (because we're raising 'those' kind of children) but just felt like she needed to be upset about it.
Monday, October 18, 2010
Another block done
I finished the fourth block in Sharon's Annie block of the month.
On another note, my kids think I've lost my mind. They're pre-teens so what's new, right?
But, before I let them give clothes away I always go through the sacks. (I've got about 5 garbage bags full of clothes to go through right now.)
Anyway, I always check to make sure they're not giving away something that has fabric that I fell in love with when I bought the clothes in the first place. Some things I'm just not willing to part with that easily because I love the fabric and I know I can use it in some other way. I also have to make sure that they aren't trying to donate things that are ruined and just need to be thrown away. I read an article not too long ago on how much charity thrift shops are forced to spend and waste services just to haul off the things that get donated that aren't fit to be sold.
But I also have to go through the clothes to make sure they're not trying to get rid of things like this:
This is a pair of socks that I bought for my girls. One of them decided to play outside in the socks with no shoes and put a big hole in the bottom of one. Well, she decided to get rid of them and I just about fainted when I found them about to disappear forever. Look at all of those buttons that she almost sent to be thrown away!!!! Gaah! LOL
That's the real reason they think I'm crazy. Because I grabbed the socks out of the bag and then sat and cut all of those buttons off. What a waste that would have been.
I just can't wait to get all of these blocks made and sewn together. It's just going to be so cute!!!
I've already even got the next block traced and ready to start stitching. Yeah me! lol
But, before I let them give clothes away I always go through the sacks. (I've got about 5 garbage bags full of clothes to go through right now.)
Anyway, I always check to make sure they're not giving away something that has fabric that I fell in love with when I bought the clothes in the first place. Some things I'm just not willing to part with that easily because I love the fabric and I know I can use it in some other way. I also have to make sure that they aren't trying to donate things that are ruined and just need to be thrown away. I read an article not too long ago on how much charity thrift shops are forced to spend and waste services just to haul off the things that get donated that aren't fit to be sold.
But I also have to go through the clothes to make sure they're not trying to get rid of things like this:
This is a pair of socks that I bought for my girls. One of them decided to play outside in the socks with no shoes and put a big hole in the bottom of one. Well, she decided to get rid of them and I just about fainted when I found them about to disappear forever. Look at all of those buttons that she almost sent to be thrown away!!!! Gaah! LOL
That's the real reason they think I'm crazy. Because I grabbed the socks out of the bag and then sat and cut all of those buttons off. What a waste that would have been.
Tuesday, July 6, 2010
T-shirt refashion
I remade a t-shirt that I had bought on a clearance rack for $2 or something like that.
I started with a shirt that was too big for me.
I cut it off right under the arms.
Then I used the fabric from the back of the shirt top to make straps.
Then I used elastic thread in the bobbin to put in a few lines of shirring on the back.
That helps it to stay a little more tightly against me. That way I don't flash anyone if I bend over.
I'm pleased with the way it turned out. It fits well and is comfortable to wear. I made sure to make the straps wide enough to cover my bra straps so that wouldn't be an issue either.
I would think that if you are using a shirt that already fits you could avoid the shirring in the back.
I've taken the time to be busy in my sewing room studio (sounds more sophisticated) and I've been loving it. If only I didn't have so much other stuff to take care of too. *sigh*
Monday, October 19, 2009
Hand warmers
I don't know if you're aware or not, but fingerless gloves are back in.
In a big way at our house.
Kirsten has been wanting some sssssoooooo baaaad (or so I'm told.)
Well, the other day she was putting away a basket of clothes and found a pair of black gloves and asked her Dad if she could cut the fingers off. Of course he said sure.
When I got home later she was thrilled to show me what she had made.

That's great....except they're MY gloves....or is that were?
Since she wanted that kind of thing I dug out an old pair of their tights--I don't think they ever wore them--and made a slightly different pair.

She thinks they're 'all that' and wore them to school.
By the way, the shirt she has on was a turtle neck the night before with long sleeves. She didn't wan't a turtle neck and the cuffs were stained so a pair of scissors took care of that. :0)
In a big way at our house.
Kirsten has been wanting some sssssoooooo baaaad (or so I'm told.)
Well, the other day she was putting away a basket of clothes and found a pair of black gloves and asked her Dad if she could cut the fingers off. Of course he said sure.
When I got home later she was thrilled to show me what she had made.
That's great....except they're MY gloves....or is that were?
Since she wanted that kind of thing I dug out an old pair of their tights--I don't think they ever wore them--and made a slightly different pair.
She thinks they're 'all that' and wore them to school.
By the way, the shirt she has on was a turtle neck the night before with long sleeves. She didn't wan't a turtle neck and the cuffs were stained so a pair of scissors took care of that. :0)
Friday, September 18, 2009
Recycled containers
Over the weekend I recycled these empty containers instead of throwing them away. The large one originally was full of pretzels and the two smaller ones had peach salsa.

I spray painted the tops of all of them red. Then I hot glued the ribbon around them with a smaller piece of ribbon to tie the tags to. For the tags I just used some that I had bought in the scrapbooking department awhile back.
I love the way they turned out. It's a great thing to do with containers once they are emptied. I just wish that all of my pantry could look like this. Maybe in time I can get it all organized and cute looking as we use up more jars.
Wednesday, September 9, 2009
Quick recycle
Our dogs have both recently destroyed the nice fluffy cushions in their kennels. I hate the idea of them being in there just laying on the hard plastic bottom so I had to do something about it.
I had an old blanket that I had found on the side of the road. I used it just folded up for the dogs to lay on the floor. I cut it to fit the kennel, used a double thickness, and just stitched around the edges.


It's not beautiful, but it does the job (and it was free). And, I still have enough of the quilt left over to make two more....just in case the dogs tear these up too.
I had an old blanket that I had found on the side of the road. I used it just folded up for the dogs to lay on the floor. I cut it to fit the kennel, used a double thickness, and just stitched around the edges.
It's not beautiful, but it does the job (and it was free). And, I still have enough of the quilt left over to make two more....just in case the dogs tear these up too.
Tuesday, August 25, 2009
Wardrobe Refashion
I've asked the kids to go through their clothes and pull out the things that are too small or that they just don't want anymore. They are so skinny though that lots of pants still fit in the waist but have gotten too short. These fit into that category.

I just loved the plaid and hated to see them go so I decided that they could be a skirt.

I cut them off at an appropriate length. Cut the inseams out. Then sewed them together for the skirt. I used the remainder of the leg fabric to make the ruffle around the bottom. I would have liked for the ruffle to be a little more full but I couldn't match up the plaid for the remainder piece of fabric. Oh well, I think it turned out well and the girls are happy with it. Another plus, it only took about 30 minutes total to get it done. Not bad. :0)
Tuesday, April 28, 2009
More Dollar Store Design...
Okay, I've already shown you the cake stand made with the dollar store purchases. I bought 4 things that day. Well, I guess 5 if I include the glue. lol Here's what I bought...

This time I used the glass bowl and the ashtray. (yes, an ashtray!!) I turned the ashtray upside down to make the base for the bowl and glued them together.

Then I decided that the bowl needed something to bring out some of the design so I painted part of it.

I haven't decided yet if I like it or not.


But, the great thing about it is that I just used cheap craft paint so it wipes right off with a little glass cleaner. If I decide for sure that I don't like, I can get rid of it. AND, if I want to, I can change the colors to go with particular decorations.
Mostly I have to say that I'm loving trying to look at things a little differently when I'm out and about. It adds a whole new dimension to shopping.....like I needed that. lol
This time I used the glass bowl and the ashtray. (yes, an ashtray!!) I turned the ashtray upside down to make the base for the bowl and glued them together.
Then I decided that the bowl needed something to bring out some of the design so I painted part of it.
I haven't decided yet if I like it or not.
But, the great thing about it is that I just used cheap craft paint so it wipes right off with a little glass cleaner. If I decide for sure that I don't like, I can get rid of it. AND, if I want to, I can change the colors to go with particular decorations.
Mostly I have to say that I'm loving trying to look at things a little differently when I'm out and about. It adds a whole new dimension to shopping.....like I needed that. lol
Saturday, April 25, 2009
Dollar Store Design...
I've been playing around looking at other blogs (that happens a lot LOL) and came across a lot of neat things that other people have made. Sooooo, I ran to the dollar store while I was taking a break and picked up some things. I got these...

I took the plate and the sundae glass and glued them together. It gave me this...

A simple little cake stand!! I know it's not the most beautiful thing out there, but I thought for $3.00 (that includes the glue for them) it turned out great. I think that it can be put in the center of my table, or even the island, with some cute decorations and be great. You should give it a try. For just a few bucks there's not much to lose.
I glued the other items together but I'm not done with them yet. I'll show them to you later. :0)

I took the plate and the sundae glass and glued them together. It gave me this...
A simple little cake stand!! I know it's not the most beautiful thing out there, but I thought for $3.00 (that includes the glue for them) it turned out great. I think that it can be put in the center of my table, or even the island, with some cute decorations and be great. You should give it a try. For just a few bucks there's not much to lose.
I glued the other items together but I'm not done with them yet. I'll show them to you later. :0)
Subscribe to:
Posts (Atom)