Showing posts with label sewing. Show all posts

Tuesday, January 19, 2016

A gift for my daughter

I made a cute little pillow for my daughter as one of her Christmas presents.

The pattern is just her sense of humor.


The pattern is from Daily Cross Stitch.

If you're not signed up with them, you should go do it. You will get a pattern each day that is free for that day. After that, it is available for purchase. They also offer a monthly club. I'm not a member of that so I don't know really what it offers. But, the patterns are cute and pretty simple. Check it out.

Friday, October 23, 2015

Making it work

My dear husband ordered some pillows after watching an infomercial that are ridiculously long. I've had these red pillow cases for awhile and wanted to insert a strip with stitching in them, but was putting off having to measure how much to cut them down for the piece to fit while making it look right. But, with these new pillows, I actually needed that piece in there to make them fit. Win, win!

I started with the red pillow cases and some tan fabric.


I cut the hem off the pillow cases, cut out a strip of the tan fabric, and then put it all back together.


I stitched on each pillow case.


I really like the way they turned out and the way they look on the bed. Although, if I was doing them again, I would have actually traced some fancier letters on there instead of just winging it.

It makes me happy!!

Monday, June 22, 2015

Easter Pillow


I recently finished this cute little Easter pillow.


I got the kit from Sharon at Daisy Cottage Quilting. I don't know if she still has kits or the pattern available, but I know she has (maybe had by now) a finished one in her Etsy shop. She always has some of the cutest stuff. Go check it out.....and then drop by my shop and browse a little too.

Friday, May 29, 2015

Finally a finish

Do you ever feel like it's been forever since you finished something? Even if it hasn't? I certainly do.

I made myself a commitment that I wouldn't buy anything more until I finished some of the tons of things I have around here already. So, I've been busy working on just that.

I recently finished this cute runner.


(Couldn't get it all in one picture.)

To hold my binding down while I stitched it, I used these cute little tiny clothes pins.


It wasn't what I bought them for. But, hey, necessity is the mother of invention.

Saturday, February 28, 2015

Upcycled pin cushion


 How cute is this tiny little pin cushion?


It's only about 2 inches tall by 3 inches wide. 

I used a little cup that I filled with ground walnut shells (to help sharpen pins) and glued a little puff filled with fiber fill. I lined under the fabric with a piece of felt to help hold the pins in place.

I just can't get over how cute it turned out! I've got several more little containers to work with and can't wait to see how they turn out. 

Thursday, January 1, 2015

Recycling I like

I know that most often when people talk of recycling, it's just aloud putting your stuff into the correct bin and assuming that it's being taken off to be torn down and the reused. I prefer taking something I have and making it into something new myself. That way I know what happened to it.

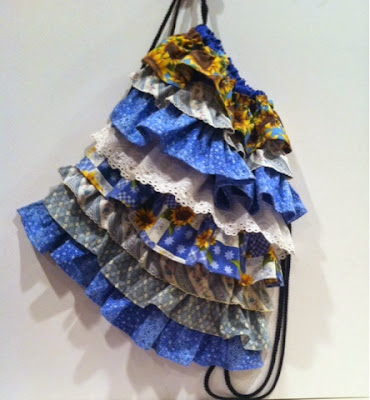
One of my kids had received a nylon backpack at a music festival that she participated in. It's not the kind if thing that she was going to use. So, after it sat around here for eons, I finally decided to so something with it.

I gathered up material in coordinating blues.....


Cut my fabrics into a bunch of strips which which I then gathered and sewed onto my backpack in layers. To make this easy, I advise that you start at the bottom and work your way to the top.

Here's the finished product...


I am pretty happy with the outcome. That's the way I like to recycle. It's much prettier than it started out being.

Monday, September 22, 2014

Drink Cup Cozy

I can't believe how much time has gone by between my posts! It's been that way all year too. I don't even know why. I guess that I just get too busy. The kids all have their things going on which keeps me crazy busy too. It seems that by the time I get a few extra minutes when I could be updating my blog, I'm just too tired to do anything more. lol

But, I have actually been getting things done.

For example,

I used some of my scraps to make a cup cozy.

I decided on fabrics in red since it's my favorite color.


I just cut strips of different sizes depending on what I had to work with. Then I just stitched them together in straight lines.


You can see that one of my pieces ended up being a little shorter than the others. I hate it when it becomes obvious that I wasn't paying as close attention as I should have been.

I used one of the paper holders that I got from a local coffee shop as my guide. But, does the coffee in the cup that it came around counts as a 'research' expense or 'supplies'?

Anyway, I traced that on the back side of my piece.


Then, I cut it out about 1/4 inch bigger than the lines I had drawn.


After I had that piece, I cut out a piece of batting, and a piece from a coordinating fabric. I like the whole optical illusion that it creates to lay these pieces out like this. They're all the same size, but it certainly doesn't look like it.


 Then I layered them like you see here. My single piece with the right side facing me, my stripped piece face down on the single piece, and then my batting on top of that.

I stitched a quarter of an inch from the edges and then trimmed things as close as I could, leaving an opening on one end. That opening allowed me to turn my piece right side out and left a place for me to sew my elastic loop to.


Here's the turned piece...


I put a little loop of elastic in the opening on the one end, folded my pieces to the inside, and then top stitched around the entire piece.


I put two heart-shaped buttons on the end opposite from my elastic loop. I decide to use two buttons so that I could adjust the fit if I needed to.


Ta-Dah! It's all done!!


I really like the way it turned out. I like things that feel homey and this does to me.

Now if only I could remember to take it with me when my husband and I go to that coffee shop on our Sunday morning dates.

Wednesday, July 2, 2014

Upcycled overalls

I started these forever ago. I put them away (probably because people were coming to my house) and then promptly forgot about them. I recently came across them again and finished them.

I just love them!!


Here's a close up of the face I put on the bib part:
 

I used a page from a children's coloring book as the basis for my pattern. I think that's a great place to find things to pattern off of.....especially the ones for younger children because they're big and simple.

I can't believe I forgot about having these because I was almost finished with them when I had to put them away. It probably took me all of 10-15 minutes to get them done. Sheesh!!

Friday, February 14, 2014

A cute little bag

Wow! So much time goes by so quickly and I suddenly realize that I haven't posted here in ages. How does that even happen?

Awhile back I made a quick little bag. Turns out that 'little' is the key word here. The bag came out much to small for me to use for anything, so my daughter is using it as a makeup bag.

Anyway, you can find the 'instructions' here. I'm using the term instructions a little loosely because there are only pictures. It's all a guessing game.

I started with this pair of capris that I never wear. I figured that the side pockets would be great on the outside of the bag.

 
I did my best to figure it all out by following along with the pictures and this is what I ended up with.
 
 
 I with it had turned out bigger because I really like it, but it's working for her so I figure that makes it a success!!
 

Thursday, December 19, 2013

You can never have too many purses....

Or maybe I should say that I wouldn't ever admit to having too many purses.

And to go with that kind of thinking, I made this cute little bag for myself.


The pattern is really easy and it only took a couple of hours, start to finish, to get the purse made. I did make one change to the pattern though. I have a concealed carry license and often carry a firearm with me, so I really like to have a place to put it. Ha! Anyway, I added two large pockets to the inside of the purse. They start from a couple of inches below the top of the purse and extend all the way to the bottom. Because I put them in the middle, it actually separates the inside of the purse into two sections. It wasn't part of the original pattern, but it was a really easy little tweak.

I took the purse with me while we were in Las Vegas and actually had someone (a woman in an accounting class with me) ask me about it and express interest in maybe purchasing one. That's always the best compliment, isn't it?

I got the pattern from a link that my daughter sent me via Pinterest, but now I can't find it for the life of me. It's not in my Pinterest 'likes' or on any of my boards. I even did a search of where I thought it linked back to and still can't find it. How crazy is that?! I printed out the instructions, so I'll dig those up and post the link here as an update.

Wednesday, July 24, 2013

I took my husband's shirt

I did! I took it right out of his side of the closet and cut it up to make a shirt for me. When he saw what I was doing he was like, "Hey! Isn't that my shirt?" And I said, "Yes, it sure is!" And I don't even feel bad about it. Because, the truth is, he has never worn it and it's been hanging there for at least 3 years. So I decided to put it to good use and make something for myself.


I saw this shirt on Pinterest and I went and checked out the pattern and tutorial at Craft Habit.

Isn't it cute?

But, I wasn't starting with just fabric so I kind of had to just wing it......so mine doesn't really look like that either.

I started with this shirt, which I shopped from my closet (on my husband's side).


See, if you look on the edge of the table by the sleeve, you can see the price tag still attached. Three plus years is long enough to wait to see if he'll wear it!!

Anyway, I cut off the pocket and the buttons. Then I cut off the area where the buttons were, the area with the buttonholes, and the collar. I cut all of that off in one long strip. But I kept it around just in case.....and it's a good thing I did.

Here's the shirt after I cut that part off.


Then I tried it on and marked where I wanted the neckline to come to. I cut off the excess so that it was v-shaped then seamed it together all the way down the front.

Because I'm kind of a lazy crafter I decided to use the strip that I cut off the front of the shirt where the buttons had been as my facing along the neckline. It had been folded over and stitched so it would give me a finished edge on the inside too, so why not? And it worked out great!

Then, I tried the shirt on again and marked how much to take it in under the arms and along the side and also where to cut it off under the bust.

I stitched it up and cut off the excess on the sides and put a couple of tucks under the bust. (Oh, and did you know you can use a fork to make your tucks so that they're always the same? You can see the tutorial here. Genius!)

Then I took in the bottom of the shirt at an angle (the piece that I had cut off from under the bust) so that it fit to the bust line and got wider as it went down to the hips. This didn't take long at all and here's the finished project.


It was still a little loose when I got it finished (it made the bust line poofy) so I added a band from the side seams across the back to pull it in a little.

For that I used a piece of the strip of fabric I had cut off the front that had the button holes in it. To make it look finished I stitched some buttons on also, but they're really only there for looks. :0)


I was really please with how it turned out. Especially since I didn't have a pattern. Just an idea in my head sparked by that Pinterest find.


Thursday, March 7, 2013

I have a finish!!

Oh my! I can't believe it's been almost a month since I last posted. Where has the time gone?

I have been busy, but doing orders for people (which I am grateful for) so I haven't done as many new things to show here.

I did, however, make a new purse for myself.


I used my new sewing machine to embroider the initial on the front of the bag (woohoo!) and to sew the bag together. I also included two large pockets in the center of the bag.
 

For the outer fabric, I used a cotton tablecloth that I bought at Target on clearance and used some red ticking from my stash to line the inside and make my pockets. I didn't have a pattern, so I was just winging it.

I'm happy with how the bag turned out, but it's rather big. Well, bigger than my other big purses. lol My husband said that he wasn't going to be seen with me if I was carrying that suitcase. But, he lies because he's already been out in public with me. Ha!

But, in his defense (and he'll probably never let me forget it) when I was at the grocery store the other day, the cashier thought it was my own shopping bag to put the groceries in (poor guy, awkward silence followed after I told him it was my purse.)

Wednesday, February 13, 2013

Life changing sewing tip!

Okay, I know it's been forever since I've posted something new here. I guess I'm not doing so well with the 'now' resolution as far as blogging goes......but maybe not.


I've had these pictures for some time but can't find my finished project to show. I finally decided to quit waiting for that and go ahead and post this tip 'now'. See? See how I did that? I turned things so that it looks like I really am keeping my resolution. It's one of my lesser known but highly developed talents. LOL


Anyway, I've seen it other places on the internet (which is how I found out about it) but haven't really seen it in that many places.


And I swear, it's one of the best sewing tips I've ever happened across!


I started with this ribbon (about 3 inches wide)


Now set your stitch length to the longest possible and your tension to the tightest possible and just sew down your ribbon (or fabric). That's it! (I have a video but can't seem to get it to load....grrr!)

Anyway, you'll end up with this:


Amazing, isn't it?

I used this technique for the ruffle on the comforter for Kirsten. This makes gathering so easy that I don't mind doing it at all anymore.


Let me know if you try it and if you think it's as life changing as I do!

Thursday, October 25, 2012

Quick Skirt

I made a skirt out of some knit fabric that I've had for.ev.er.

No, seriously, I mean forever. And I had a ton of it. I made this swim suit cover out of the same fabric. So, yeah, a lot of it.

Anyway, I had seen a cute ruffled knit skirt and decided I should have on for myself.

I came across a couple of different life changing techniques for gathering fabric. And I do mean life changing. The thought of gathering for ruffles doesn't even make me want to scream anymore.

First I cut two pieces of fabric long and wide enough to make the skirt. Then I cut the remaining fabric that I had into strips that are five inches wide. I only decided on 5 inches wide because that's how wide my ruler is and that makes everything easier.

Note: It is important to make sure that the stretch of the fabric goes across the strips and not down the length of them.

To gather all of these strips you simply sew them as normal, but while they are going through pull the fabric away from the needle on both sides.

 I used both hands while doing this but couldn't take a picture that way too. lol So, does that make sense? With the right hand stretch the fabric to the right and with the left hand stretch it to the left. That's why it's important that the stretch of the fabric goes across the strip of fabric.

 Just doing that while you're stitching along the strip gives you a result like this.

Then, I attached them to my skirt. I simply folded over the top piece and stitched it down to cover the top of the top ruffle.
It was really quick and easy. (Please ignore that I didn't make sure all the ruffles were smoothed down in this picture. lol) I didn't even hem anything since it's a knit. It just wasn't necessary.

If you haven't tried gathering this way you simply must. It will change the way you feel about it completely.

Monday, August 20, 2012

Getting ready for school

My kids start back to school next Monday.

I guess that means that I have to buckle down and make the things that they'll need for school. I've put it off just about as long as I can.

This morning I finished up Abigail's lunch bag.


I used the same materials that I used in this bag (a vinyl table cloth and an old sheet.) That bag was supposed to be a lunch bag but I missed one small detail in the directions (cutting my fabric piece in half) and wound up with a group sized lunch bag.

This one turned out much better!!

I didn't follow a pattern for this one. I cut the fabric to what I thought was about the size of the bag I wanted, making sure to make one side much longer than the other so that I could have a flap to fold over. I used a plate to round the edges of my flap, and put button holes in it so that my ties would fit through and tie it closed.

I think it turned out really cute and I just love that the pattern is silverware for a lunch bag. Abigail likes it too, and that's what matters most.

Friday, August 3, 2012

All in a name

 The only thing I've actually managed to get done this week is a name shirt that a customer ordered.

I have to admit that this shirt was more difficult to sew. That's a lot of tiny letters for a 5T shirt.


I had trouble getting a good picture.....as usual. I'm certain that I need a big, fancy, expensive camera. Don't you think so too?

The last couple of shirts for little girls that I've made have been requested in purple. So I'm thinking the popularity of purple is on the rise.

My husband and I did have a little trouble with the police, this week.

Here they are trying to get my husband to leave. You wouldn't think it would take that many deputies for one guy!

Just kidding, now. That's part of the strike force that handles crowd control and they were doing training exercises. We were part of the volunteers that were there to be disorderly and refuse to leave when told. It was fun. It's not often that you get to ignore the police with no consequences. HA!

I've got a list of things to get done this weekend, so we'll see what happens.

Thursday, May 24, 2012

It's a wrap....

It' been a couple of weeks since I made this swim suit cover, but couldn't get a decent picture. So I just gave up and went with what I had. I do apologize because we had already been down to the pool when I had Dax take these (and had a couple + drinks).


Anyway, this is super easy and only took a few minutes to make. I found the original by looking on Pinterest. (I know. I know. I may need an intervention.)

You can find the original post and tutorial on La Vie En Rose  here. She has several variations with tutorials.

Seriously, I don't think it could be easier.

Saturday, August 13, 2011

ABC's

It's not that I haven't been doing anything, I just haven't been finishing anything. lol


That's what happens when you work on something bigger.


At the moment, I'm busy learning my ABC's....


I'm loving these blocks!!